Tuesday, July 26, 2011

Monday, July 25, 2011

Let the Sneaks Begin...Sneak #1!!

Happy Go Lucky by Lan

THIS WEEK'S SCRAPROOM STEAL: (July 25-31)


THIS WEEK'S SCRAPROOM STEAL:
(3) LAYOUT KIT BUNDLE: $6.50 (55% Discount)
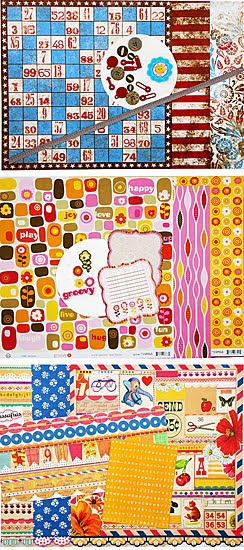
This week's ScrapRoom Steal is a bundle of (3) layout kits. You'll receive all of patterned papers and embellishments shown here. (Note: these kits do NOT include cardstock.)
  1. GLITZ KISMET: (3 sheets 2-sided patterned paper, (1) BasicGrey Bloomer flower, (8) assorted 7gypsies photo turns w/brads, coordinating coconut buttons, brown herringbone twill)
  2. KI MEMORIES GROOVY: (3 sheets 2-sided patterned paper, 1/2 pkg. Groovy softies, (2) die-cut journaling tags)
  3. SASSAFRAS LASS CHERRY DELICIOUS: (3 sheets 2-sided patterned paper, 1/2 sheet 12" flag banner border stickers, 1 sheet My Little Shoebox Lemon Pie alpha stickers)
(Shipping for NON-Club Members will be $5.99./TSR Members can elect to have this item shipped with your next club shipment.)

You can purchase this week's Steal through our shopping cart by clicking on the following link: THIS WEEK'S SCRAPROOM STEAL. Or, if you are currently a TSR member, then you can e-mail us with your order at admin@scrap-room.com. :)

HERE'S HOW IT WORKS:
  • Each Monday morning between 7:00 and 9:00 a.m., we'll post a new super-saver-scrappin' deal that we're calling SCRAPROOM STEALS! Quantities on these steals are very limited, and when they're gone, they're gone.
  • ScrapRoom Steals are offered for one week only or until they're gone!
  • ScrapRoom Steals are amazing Scrappin' Deals, with everything being discounted at least 40%-90% off of retail prices.
  • Since you know we love kits, most ScrapRoom Steals will consist of items bundled together for greater savings (and more fun)!

  • ScrapRoom Steals Shipping Policy:
  • ScrapRoom Kit Club MEMBERS can elect to have their ScrapRoom Steals shipped along with their next monthly shipment by selecting the "MEMBER ONLY" option when checking out. If shipped with a regular monthly kit club shipment, there will be no additional shipping charges, although the ScrapRoom Steal itself will be charged to the Member's credit card at the time of the purchase.
  • Customers who are NOT ScrapRoom Kit Club members are still eligible to purchase the Weekly Steals. The indicated shipping charge will be added to the total before the credit card is processed, and the item will ship out within 2-3 business days.
  • Friday, July 22, 2011

    Kim's Scrapbook Staple...

    ***We have a GIVEAWAY going on at the moment...check out the original post HERE!


    Hi Scrappers!!!! I wanted to talk to you today about what I consider to be a scrapbook staple....my pens!!!!! I use my pens on every one of my scrapbook pages. Journaling is not the only thing these pens can do....no sirree!!!! Here are some examples of how I use them.....Outlining or adding something extra to my letters, as in the title below.

    In this layout I used my signo pen to outline my paper die cuts to make them POP and look at how the signo pen helps the title to stand out on the page....perfection!!!!!!

    Now this is my favorite technique.....I take my paper piercer to make stitching holes and then draw in my stitching with the signo pen. Sometimes I will take my zig pen and draw wide black stitches then use my signo pen and draw a thin line of stitches. The two of them together really makes a bold statement on your pages. Some of these concepts may not be new to you but I always advise new scrappers to invest in these two pens. I hope you will try some of these ideas on your pages. Sometimes the smallest idea can make the biggest difference. Now get your pens out and use them...they are just as important as paper and adhesive!!!!!!

    Thursday, July 21, 2011

    Freaky Fast Page #3 and a Giveaway!!

    Happy Thursday! Frances here to share my final layout using the Freaky Fast Formula of the month! If you missed the first post, you can check it out HERE. Like I mentioned before, I created my formula to basically "get more pages done"...the TSR motto! Just in case you forgot, here is the formula...

    1. Cardstock Background
    2. 8 X 10 patterned paper
    3. 6 X 12 patterned paper
    4. 3 X 12 patterned paper
    5. 1 1/2 X 12 patterned paper

    And here is the steps to completing LAYOUT #3 using the formula...

    1. Collect a few pics.
    2. Cut your patterned paper to the dimensions stated above.
    3. Push the paper around your cardstock till you achieve the look you want, or simply copy my layout below!
    4. Adhere and EMBELLISH! It is that easy!!

    And my third and final FREAKY FAST PAGE...

    Life in the Fast Lane


    This layout was created using Girl's Paperie Kitch from our July kit, and just like the weeks prior, the placement of the paper came together super easy!! The main difference between this layout and the others, is that the paper placement is at the top of the layout! Who would know that it would make such a different looking layout, right? Again, I am super surprised at just how different the layouts look by just using a different collection and shifting some paper. This layout...35 minutes...NO KIDDING!! Wooooohoooo for that!!

    Here is a look at all 3 of the layouts together...to get the full effect!!

    Layout #1

    Layout #2

    Layout #3
    I hope you enjoyed my FREAKY FAST PAGES feature this month! And I think you just might see this again...what do you think? Let me know if you would like to see this again by leaving me a comment in this post! I will choose a winner randomly to win a yummo prize of scrappy goodies!!! I will post the winner next Thursday, July 28th!

    Thanks again for visiting, and see ya next Thursday with a winner!

    Tuesday, July 19, 2011

    Memory Lane

    When I saw the WRMK Monopoly paper in this month's kit, it instantly took me down memory lane.

    My sisters and I would always play Monopoly when we had something fun to do later that day or night. The game would take forever and when it was finished it was time for our fun activity/event! I knew I wanted to scrapbook this memory, but I didn't have picture of the Monopoly game board from the 80s.

    So what to do????

    I searched Google images for a Monopoly game board and viola.....success! Searching Google images is super easy! You can even search by image size so choose a medium/large size so it will print nicely. Next time you need a picture for a scrapbook layout....try searching Google images (some do have a copyright so be respectful).

    Here 's my layout with my picture of the game board....just how I remember it :)


    Monday, July 18, 2011

    THIS WEEK'S SCRAPROOM STEAL: (July 18-24)


    THIS WEEK'S SCRAPROOM STEAL:
    SEI MINI-ALBUM BUNDLE: $4.80 (40% Discount)

    This week's ScrapRoom Steal is a set of (2) mini-albums from SEI.
    1. (1) SEI 8x8 Preservation Album. This SEI sleek and slim 6x6 Preservation Office Album in Blue is perfect for any of your scrapbooking projects! Album comes with 10 acid free page protectors.
    2. (1) SEI "JOY" Chipboard Word Album. This album measures approximately 4"x 6" and is perfect for creating a quickie altered mini-album. Album comes with (2) binder rings.
    (Shipping for NON-Club Members will be $3.99./TSR Members can elect to have this item shipped with your next club shipment.)

    You can purchase this week's Steal through our shopping cart by clicking on the following link: THIS WEEK'S SCRAPROOM STEAL. Or, if you are currently a TSR member, then you can e-mail us with your order at admin@scrap-room.com. :)

    HERE'S HOW IT WORKS:
  • Each Monday morning between 7:00 and 9:00 a.m., we'll post a new super-saver-scrappin' deal that we're calling SCRAPROOM STEALS! Quantities on these steals are very limited, and when they're gone, they're gone.
  • ScrapRoom Steals are offered for one week only or until they're gone!
  • ScrapRoom Steals are amazing Scrappin' Deals, with everything being discounted at least 40%-90% off of retail prices.
  • Since you know we love kits, most ScrapRoom Steals will consist of items bundled together for greater savings (and more fun)!

  • ScrapRoom Steals Shipping Policy:
  • ScrapRoom Kit Club MEMBERS can elect to have their ScrapRoom Steals shipped along with their next monthly shipment by selecting the "MEMBER ONLY" option when checking out. If shipped with a regular monthly kit club shipment, there will be no additional shipping charges, although the ScrapRoom Steal itself will be charged to the Member's credit card at the time of the purchase.
  • Customers who are NOT ScrapRoom Kit Club members are still eligible to purchase the Weekly Steals. The indicated shipping charge will be added to the total before the credit card is processed, and the item will ship out within 2-3 business days.
  • Saturday, July 16, 2011

    Up Close and Personal with Kim!

    Hi Scrappers!!!!!! Today I wanted to share with you how much I just looooooove the Bazzill (Double-Shot) kit!!!!!!! Did you know Bazzill has come out with their own lines of printed papers? Well they did and they are fabulous!!!!! The line I worked with is "Worth Remembering". Here, let me show you......


    I just looooove this fabulous color scheme!!!!! The black, red, and turquoise combo is simply stunning!!!!! Another fave is the fabric flowers! I had the privilege to work with these flowers on a previous assignment, so imagine my excitement when I found these beautiful flowers when I opened my kit! Yippiee Skipppee!!!!! I am not much of a flower gal, but these are just so perfect and they can stand alone without adding a cluster....that is my kind of flower!!!!! Another thing you may have noticed on my layout...... Bazzill has also come out with these fab pleated borders!!!!! Genius I tell ya!!!!!!! Takes the work right out of your hands!!!!!

    I hope you enjoy your Double Shot kit as much as I did!!!! It is so versatile and has so much potential!!!! You can scrap any occasion with this line! So get to scrappin' and be sure to let us know what you think. I can't wait to see what you will create with the new Bazzill, "Worth Remembering".

    Friday, July 15, 2011

    Bannerific! Tutorial by Jenny!!

    Banners are all the rage right now! You can see them everywhere from altered projects to cards and layouts. I have seen birthday banners all my life, but whoever decided to shrink them down and fit them on a scrapbook page is genius! :) I LOVE the look of banners. They add such a whimsical and fun feel to a layout.

    Premade banners are super fun and so easy to use on your pages…but did you know that making your very OWN banners is just as easy? It’s true! Plus, it helps use up scraps of paper, and I know we all have plenty of that! ;)

    Banners can be made with shapes other than triangles, too. Simply use your favorite small punch on your next banner and see how easy it is to create a unique, custom-made, one-of-a-kind banner on your next project!

    For the page below, I used my heart punch to create the heart shapes for my banner and then created my own "flag" shapes:


    The flag shapes are super easy! Just follow these instructions:

    1. Use your paper trimmer to cut strips of paper, any width and length you choose:


    2. Fold each strip of paper in half:


    3. Hold the paper folded in half and simply cut out a “V” shape at the bottom (don’t cut the folded end, but the open ends):


    4. Here is what your strips of papers will look like after you have cut out the "V's":


    5. Open up the folded papers and drape each piece of paper over thread, ribbon, or twine, using the folded edge to “hang” on the thread. (Note: No thread, twine, or ribbon? No problem! Just adhere your banner pieces the way you want them, and then use a pen to draw a line above them to connect them):


    6. Use a small glue dot or liquid adhesive to adhere the “V” shape back together:


    9. Continue adding your flag shapes and punched hearts until your banner is complete!

    You can alternate your “V” cut papers with punched shapes to make a truly unique banner, and then add bling or brads randomly between the shapes like I did below:


    On the other example below, I used the same technique but made only the "flag" shapes for my banner, varying the widths and lengths of each flag piece:


    Punched circles folded in half also make adorable scalloped banner shapes!

    So, there you have it. Easy peasy, right? I can’t wait to see the banners you will create!

    Thursday, July 14, 2011

    Day 2 of Freaky Fast Pages!

    Hello again...Frances here! And if you missed my first installment of Freaky Fast Pages last week, you can check out the post HERE. Like I mentioned before, I created my formula to basically "get more pages done"...the TSR motto! Just in case you forgot, here is the formula...

    1. Cardstock Background
    2. 8 X 10 patterned paper
    3. 6 X 12 patterned paper
    4. 3 X 12 patterned paper
    5. 1 1/2 X 12 patterned paper

    And here is the steps to completing LAYOUT #2 using the formula...

    1. Collect a few pics.
    2. Cut your patterned paper to the dimensions stated above.
    3. Push the paper around your cardstock till you achieve the look you want, or simply copy my layout below!
    4. Adhere and EMBELLISH! It is that easy!!

    Here is a look at my second FREAKY FAST PAGE...

    Clear Skies


    This layout was created using Pink Paislee's Hometown Summer from our July kit, and just like last week, the placement of the paper came together super easy!! The main difference between this layout and last week's layout, is that the strips are vertical instead horizontal...it was a no brainer! It also really surprised me just how different the layouts look by just using a different collection, and shifting some paper. By the way, this layout took me 22 minutes...NO KIDDING!! That is quick!!!

    I hope you enjoyed this week's installment of FREAKY FAST PAGES!!! Make sure and stop by Thursday of next week for a new layout using the same formula. And let me just say that the layout you will see next week, will be completely different! And next week's layout took me about 30 minutes! Yep, still "Freaky Fast!"

    If you like this idea, I would love to hear it! And if you choose to play along, I would LOVE to see it! Just leave me a link in this blog post so I can leave you some love, and I think I may be able to find a RAK somewhere in my scrappy hoard to share...just sayin'!

    Thanks again for visiting, and see ya next Thursday!

    Wednesday, July 13, 2011

    Up Close and Personal with Sarah!

    Hello everyone!! Have you seen the kits this month??? They are GORGEOUS! I just can't pick a favorite line, but I have to say the Girl's Paperie line in the Double Shot kit was perfect for photos of my little girls. I don't usually scrap with red, I am more a pink kinda girl, but red looks so good with these papers! Does Tammy know how to pick them or what? Just another thing I love about the kits- they get me to try something new. I would have definitely picked pink cardstock, but Tammy knows best and the red is a much better choice!

    This is one layout that I created with the Girl's Paperie in the Double Shot kit. If you have a bunch of punches sitting around waiting to be used this layout is for you! I used the following punches on this layout- circle punch (two sizes), scalloped circle punch, heart punch (two sizes), photo corner punch and butterfly punch. So thats a total of 7 punches on one page!

    I punched a bunch of the circles and then tried to randomly place them around the page. The photo is of me and my sweet Frances on Mother's Day. She may look like her Dad, but inside she is all me! She is also my little shawdow and best friend at the moment. This inspired my title because we are two of kind.


    Here's some of my punched shapes. I punched the butterflies from the packaging the brads in the kit were attached to. I couldn't let that pretty packaging go to waste!


    Look at these awesome flowers! They fit my circle design perfectly :)
    And that stitched circle? I used my favorite faux stitching technique. I used one of my punched circles as a template, traced around it with a pencil and then pierced holes around the pencil lines. Then I erased the pencil lines and connected them with my white signo pen. Look's like real stitching, doesn't it?
    

    The yellow letters are from my stash and I love how they stand out on the red cardstock. The little red stickers are from the embellishment kit and I LOVE them. They are the perfect size to finish my titles. The paper I punched the heart from is my favorite from the kit. I am a sucker for plaid prints and I used every last inch of that sheet!


    I hope you liked this peek at my layout! I can't wait to see what you create with the kit!