Wednesday, January 30, 2013

Sneak Peek #6: Echo Park Paper Love Story (DS)

"Loving My New Macro Lens" by Theresa Sovacool
"The "Love Story" collection includes both sweet images and fun animal print patterns. With all the elements included in this collection, you'll have plenty of embellishments for your upcoming anniversary, wedding, and Valentine projects." -- Echo Park Paper blog

Tuesday, January 29, 2013

Sneak Peek #5: Pebbles Family Ties (FOTM)

Project Life Week 8 by Aphra Bolyer
"Gather loved ones from near and far with Family Ties. Soft and airy blues, greens and yellows create an inviting color palette for trees, florals and geometric patterns. Find your heart and home with Family Ties." -- Pebbles blog

Monday, January 28, 2013

Sneak Peek #4: American Crafts XOXO

"Gimme Some Love" by Beth Hallgren
"Fall in love with the darling colors and patterns of XOXO. Splashes of aqua and black accent classic Valentine’s Day reds and pinks, creating the perfect palette for playful florals, hearts, clouds and butterflies. We're positive XOXO will sweep you off your feet!" -- American Crafts blog

Sunday, January 27, 2013

Sneak Peek #3: Studio Calico Darling Dear (FOTM)

"You & Me" by Melanie Call
"Dive into the deep hues and versatile designs of Darling Dear. Dark blues and teals, rusty reds and bursts of bright green blend perfectly with subtly bold geometric designs, ranging from cameras and speech bubbles to chevron and triangles. Catch the sophistication of Darling Dear." -- Studio Calico blog

Saturday, January 26, 2013

Sneak Peek #2: Crate Paper Fourteen (FOTM)

"Sweetest Valentine" by Jennifer Moore
"The Fourteen Collection is sweeter than candy and is a feast of vintage delights. Valentine’s Day icons — like hearts, flowers, lace and love notes — are doused in pinks, reds, creams and perfect touches of blue. Fourteen has captured our heart and hope it will capture yours too." -- Crate Paper blog

Friday, January 25, 2013

Sneak Peek #1: Bella Blvd Kiss Me (DS)

"You, Me & GPS" by Theresa Sovacool
"Inspired by the very fashion-forward navy blue and pink color palette comes Bella's Kiss Me. Fall in love with this playful collection of hip mustaches, hugs & kisses." -- Bella Blvd Studio Blog

Wednesday, January 23, 2013

Have Kit, Will Travel

I used to go to crops... I would spend most of an evening packing, completely fill the car (or van!), and then lug one box after another in (and then do it all in reverse 2 days later).  So, I admit... it got to be too much of a pain, so I quit going.

However... I wasn't going to be home when the January kits arrived, and I wouldn't be back by the time the reveal happened, so I knew I was going to have to climb back onto the crop wagon - and the wagon was really, really small since I was also flying and everything I was going to use needed to fit into the suitcase.  A very small part of the suitcase!

It was at this moment I realized how brilliant these kits really are.  I wouldn't really need much because these kits have a great mix of a little of everything!!!  For those of you who already figured that out, you can just sit back and laugh at me for the remainder of this post.  For those of you who haven't... check this out:  I scrapped 7 pages and 2 cards out of a pizza box.  Everything you see in the January gallery from me was done not in my scrappy space, but at my mom & dad's in Florida.

(I confess to a little cheat... Tammy shipped my kits to that FL address.  Saved me a little bit of packing space, but I had to match my supplies to the internet images.)  I bet I would have been able to fit the Doubleshot kit into the pizza box, though.

What I packed:  pizza box, a pad of blues & greens (which I ended up never using!), and my pink paper eater.  Love that thing!
Inside the box:  underneath the small stuff is a pile of 12x12 papers, pictures, and alpha stickers.  I think it looks pretty cool when you open the box.  Kind of like Christmas!
The tools (clockwise from lower left corner):  bone folder (for cards), pokie thing/sewing needle/foam square, adhesive, pink paper eater, small paper trimmer, pop dots/small roll of glue dots, exacto knife, tweezers, scissors
The extra stuff (clockwise from top):  bobbin thread (this was the thing I added but knew was silly... but what if I really really really needed to sew something????), paper leaves, bookmark blank, Tim Holtz fun stuff, tags, brad, twine
The paper and alpha stickers - and my trusty alpha sticker aligner.  Although I never used the blue and green cardstock, I did dip into the white and cream cardstock that I brought.  Never hurts to have a pile of that on hand!
And finally... the pictures and the January sketch!  I organize my pictures by event in page protectors.  So I pulled out 6 "events" that seemed like they would go with the paper in the kits.  I ended up using 4 of them. 
Hope this inspires you to take your kits with you when you travel.  I know I'm feeling a lot more confident about it!  And if you do travel with a pizza box... or maybe the TSR shipping box... snap a picture and share it with us.  We'd love to see it!

- Theresa/Savi

Monday, January 21, 2013

Divided Page Protectors and TSR... and Jenny!

Our motto at The Scrap Room is "Get More Pages Done!" That is definitely one of my goals for this year. And I have found a great and easy way to do so!

Have you ever used divided page protectors in your albums? Let me tell you...I'm hooked! I love how easy and quick these make my pages! I ordered a 10-pack of We R Memory Keepers divided page protectors from the TSR store that included:
  • Full 12"x12" (1 sheet) 
  • 4"x6" horizontal sleeves (2 sheets) 
  • 6"x4" vertical sleeves (1 sheet) 
  • 4"x6", (2) 6"x4", (1) 12"x2" sleeves (1 sheet) 
  • 4"x6", (1) 8"x6" sleeves (1 sheet) 
  • 4"x6", (1) 12"x6" sleeves (1 sheet) 
  • 4"x6", (1) 4"x12" sleeves (1 sheet) 6"x4",
  • 6"x12"sleeves (1 sheet) 4"x 4" sleeves (1 sheet)
 

All of those for just $5.99!! A GREAT deal. Trust me.

So, I chose the page protector that I wanted to use and got started. I used the Sn@p! collection part of this month's kit, which made it SUPER easy. This collection is PERFECT for use with the divided page protectors because basically, all of the design work is already done for you! Here's what I came up with:

When I turned the page protector over, I was left with this:

Like I said before...pretty much all of the design work was already done for me!! I LOVE that! I simply added a few photos, some journaling, and a little touch here and there...and this became the backside of my previous layout:

The best part?? A total of TEN photos scrapped and documented in record time!!!

Even if you don't do "Project Life" type of albums or month-in-review layouts, you can use this style in your regular albums to help "catch up" on that big stack of photos you may have.

More examples:


So, my advice: Check out the TSR Store and order some of the assortment packs of divided page protectors to use with your monthly kits....you'll be glad you did! It's a perfect way to "Get More Pages Done!" ;)

- Jenny

Friday, January 18, 2013

Mod Squad: Gab & Janine

It's a new quarter at The ScrapRoom, and that means a changing of the Mods on our Message Board.  I'm sure you've noticed Janine's challenges and Gab's Question of the Day by now - so let's meet our new Mods and get to know them even better!

Janine
Gab:  "I'd love to say I'm the younger, better looking, skinnier woman standing in the photo - but I'm not!! I'm the one sitting down!"  (But I think since she's the one getting the present, she's really better off.  LOL)
Part of the fun part of welcoming a new Mod Squad to TSR is getting to interview them.  Here's what Gab and Janine had to say over a (virtual) cup of coffee with me:

So, how did you two get started in scrapbooking?
Janine:  I start scrapbooking fervently once my first child was born.  I took so many pictures and wanted to document their stories.   A friend introduced me to Creative Memories and I used their products exclusively for 6-7 years.  I have over a dozen albums completed from that time.  However, I became bored with their products, and started seeking out new ways to tell my stories.  That is when I found TSR. Now, my paper driven interest has moved into also being a creative design outlet for me.
Gab:   I'm not really sure how I first heard about scrapbooking. I've always done crafts and always liked stationery - when I was little I wanted to own a newsagent which is a shop that sells newspapers and magazines and stationery and Lotto tickets and things like that. I get a craft shopping magazine once a quarter, and in it there was a "Hot off the Press" book on scrapbooking - I ordered it and devoured it. At that time I was living in Hong Kong and there wasn't really any scrapbooking shops. A friend of mine had just had a baby and her mothers' group was doing an introductory scrapbooking session - it was Creative Memories. So I went along and got hooked. Soon I was buying stuff online. And I bought magazines. One day I was on the ferry reading PaperKuts magazine (don't know if anyone will remember them?) and bumped into a friend that I only knew slightly. She was reading Creating Keepsakes. So we got talking and got to know each other better and eventually opened up a business together selling scrapbooking supplies and running classes.
Wow, Gab!  So you must have some favorite paper lines after being immersed in a business like that, huh?
Hmm, favourites is always a problem for me as I can never narrow it down! When I first got started in scrapbooking hands down my favourite manufacturer was Making Memories. That was before they even did paper. They had rub-ons (I still have some!), and frames and just cute embellishments. Then for a few years my fave was KI Memories. Then I fell in love with Chatterbox - they were one of the first companies my friend and I opened an account with. Then I discovered Scenic Route and Basic Grey. I was very sad when CBX and SR stopped manufacturing. Now days it's probably a tie between October Afternoon, Basic Grey, and Jillibean Soup.
How about you, Janine?
  1. My Mind's Eye - classic and beautiful papers
  2. Basic Grey - same reason - it's all about beautiful paper, isn't it?
  3. American Crafts - what would I do without their alphabets
  4. Following in fourth place is a three way tie: Fancy Pants, Lily Bee and Pink Paislee because they consistently put out lines that stand out among my favorites.
Alright, Janine... I challenge you to tell us 5 random facts about yourself.
  1. I am a one-handed scrapper.
  2. I have relentless determination to accomplish tasks that I find worthy and desirable.
  3. My favorite foods are lasagna, anything super spicy and Godiva truffles.
  4. I once tried to race a police car at 1:00 in the morning when I thought it was a friend on the road coming up behind me.
  5. I'm a certified scuba diver.
Whoa! Alright, I'm coming over to dinner sometime. *grins* And finally, Gab, what is your desk trying to say to you right now?
OMG my poor desk! I'm not really a tidy person and the biggest disadvantage of having my own scrap room is also the biggest advantage - the fact that I can close the door!! I very rarely have even 12" of space on my desk so I know it would be shouting at me to put some stuff away! I'm actually in the process of sorting and purging and deciding what scrappy goodies to take to Hong Kong as we move back there on 10 Jan.
And we've gotten the update from Gab since this interview that not only did they make it just fine to Hong Kong, but ALL their luggage did, too! Here's hoping for some scrappy happiness for you in Hong Kong again, Gab!

Both Janine and Gab have a favorite layout to share with you. Enjoy, and stop by and say hello the next time you are on the Message Board!

"Teddy Bear Picnic" by Gab
"He Did It Just For You" by Janine
- Theresa/Savi

Wednesday, January 16, 2013

Wrapping Up Project Life January

Hi everyone!  I'm back today to share two more weeks of Project Life pages, TSR style, of course.  First up is Week Three with Pink Paislee Portfolio.

Week Three


This spread using the standard Becky Higgins Design A page protectors.  The main colors of the papers were aqua, mustard, gray, and cream.  However, I detected a tiny bit of red, so I decided to add in some red stickers and cardstock die cuts to play up the red and tie in with my photos.  I like how it turned out.


For the title card, I added some mini alphabet stickers to the tab of the title.  (Just noticing that I need to change the word "Two" to "Three".  Oops.)  I decided to cut out a phrase and the number 3 on my Silhouette using the Diablo cardstock that came in the Snap kit.  Both these files are available in the Silhouette Online Store.  The stickers all came from the Snap 12 x 12 cardstock sticker sheet.  How cool that the stickers work for more than one kit?  


Another die cut.  However, this one is a free Ali Edwards download.  You can find it HERE.

Week Four


The left side is a Becky Higgins Design A page protector, but the right one is a Design F.  It holds ten 3 x 4 inch pics or cards.  Perfect!  Aside from a couple of Silhouette cuts, this page is super simple.  The Carta Bella Traditions paper is so pretty.  I didn't feel like much embellishing was needed.


I plan to go back and stamp the date on the sticker on the title card.  Just gotta get some more Staz On Jet Black ink since the sticker has a shiny surface.


So that wraps up the first four weeks in January.  I'm still pretty amazed at how well the TSR kits are working for these pages.  And, I still have enough scraps to make some traditional pages if I want.  Be back soon with my next four pages.


Monday, January 14, 2013

Got Scraps Challenge: January

So far we've used 1" strips, punched shapes, and squares... what's next? 

Flowers. 

No, wait, don't panic! Little ones, big ones, punched, die-cut, hand-cut, torn - there are lots of ways to make flowers, and they all use up scraps. Now is the time to try that fun folded flower you saw on YouTube or the tutorials from our DT that you bookmarked but didn't get around to yet. And don't give me sass about how flowers are just not anything you can use... I live with a boybarian horde. I just had to dig a little deeper for my photos. *wink* 

So, just like the Freaky Fast Formula and Page Starter, this challenge is designed to get you scrapping quickly and with a minimum of fuss. You can do as much or as little as you like, in whatever style suits you. And the best part... you just might be able to finally kill off some kits, or at least make a dent in that scrap pile! 

Step 1: Find an almost-dead kit. No kit? No worries - go dig through your scrap pile and find some coordinating patterned paper scraps.
The last bits of Fancy Pants Hopscotch
Step 2:  Make a pile of flowers.  Pull out those tutorials or seldom-used cut files/cartridges/punches. Have fun and play!
Here's what my Silhouette did for me.  Cuteness, eh?
Step 3: Find some pictures and cardstock to match your scraps. 
Ancient pics from 1975. Yes, I was alive then.  Be nice.  LOL
Step 4: Shop your stash for the extra bits, like alphas, journaling blocks, and coordinating embellies.
Lots of random bits; some from the Hopscotch kit, other parts from my stash.
Step 4.5:  Behind the scenes magic.  This is the part that happens after Step 4 and before Step 5 where I confess that I had Step 5 done and really hated it and had to do *something*.  The problem is that the paper flowers turned out to be much too bright and did not look good all stacked and layered like I had planned.  No, I did not take a picture.  Just imagine a hot, clash-y mess in your head.  So here's what I did:  I sprayed the gee-whiz out of the flowers to fix the color and then dumped them onto my desk - and I loved how it looked all randomly piled in line. 

Step 5: Finish. Make this layout your own. Do your thing! 
I got stubborn and used every single last flower I had cut.  You don't have to be that stubborn!
This took a while to make because of Step 4.5 (more confession time).  However:  I killed a kit. AND... I used some stuff out of my stash. All with flower power!  *grin*

Now it's your turn! I challenge you to turn scrappy flowers into layouts this month. You have until January 31st to leave a comment with a link to your layout here for a chance to win an awesome prize pack. An awesome prize pack like this American Crafts “Bling It On” Prize Package!
4 jars of Glitter, 4 jars of Glitter Shapes, 1 Roller Stamp, 1 roll of Glitter Ribbon
Oh, and if you do happen to kill a kit - or four - stop by the Message Board and record it in our Kit Killer thread. We've started a new thread to track our kits in 2013 - come help us out! 

- Theresa/Savi

Friday, January 11, 2013

Melanie's 12-12-12 Layout

I wanted to create a one page layout with my 12 iPhone photos from 12-12-12. How many of you also took 12 photos that day???

Here is how I created my 12-12-12 layout using this month's kit.
  1. Choose your 12 photos. I used a variety of Instagram frames and filters.
  2. Resize to 2.25" x 2.25" squares and print out.
  3. I mostly used the Simple Stories kit (it was perfect for this theme) and the B-side of a Pink Paislee pattern paper.
  4. Placed my main Title: This is the Good Life at the top of my layout.
  5. Placed the super perfect camera date sticker above the printed washi tape. FYI....it took about 24 hours for the ink to dry and not smudge.
  6. Lined all my pictures up in a grid format. My pictures are not in any order, I just put them where I liked them :). I took pictures of: my iPhone screen when it was 12:12, a little sewing project that I worked on that night, McDonalds for dinner, video game screen (kids had a sick day), Hershey Candy Cane kisses, me at my desk, hubby's computer at home (he stayed home with kids this day), work clock at 12:12, my TSR kit arrived this day, older son with his Lego mini figure from his Advent calendar, little son wanted a similar photo :), antibiotics for ear infection and pink eye -which they later shared with me :(
  7. Handwritten journaling (the lined paper was great for this)
  8. Added a secondary title and date in the bottom corner.
  9. All done with a layout that focuses on the photos.
The grid format works great for any layout with multiple photos...think of all your holiday photos from last month or birthday parties.

- Melanie

Wednesday, January 9, 2013

Project Life TSR Style

Hi there ladies!  I'm SO excited to share with you a new feature here at The ScrapRoom:  Project Life.  Just in case you haven't heard, Project Life is a different (more simplistic) approach to scrapbooking.  Using divided page protectors, you document your life in weekly spreads throughout the year.  By the end of the year, you have fifty-two double page layouts about your life.  Of course, Project Life has become such a huge phenomenon that there are many different approaches to it now.  
Here's what I'll be doing here at TSR for you.  Each month I'll be using the Flavors of the Month kit to create my Project Life pages.  Four kits, four weeks.  How perfect, right?  The only difference for me is that I'll be using my photos from 2012.  Aside from the dates, though, I'm doing a pretty traditional version. Oh, and I don't take one photo a day.  I take them whenever and wherever I feel inspired and then pull together whatever I have for my spread.  Sometimes more, sometimes less.  That's the beauty of Project Life.  It is versatile!

Not only will I be sharing my completed pages, but I'll also be posting tips and tricks, downloads, freebie links, and much more.  I would LOVE it if you would join me by posting your layouts in the special Project Life Gallery.  We can all inspire each other.

Ok, enough yapping, here is my title page and the first two weeks' spreads.  (Click on the picture to enlarge.)

Title Page 


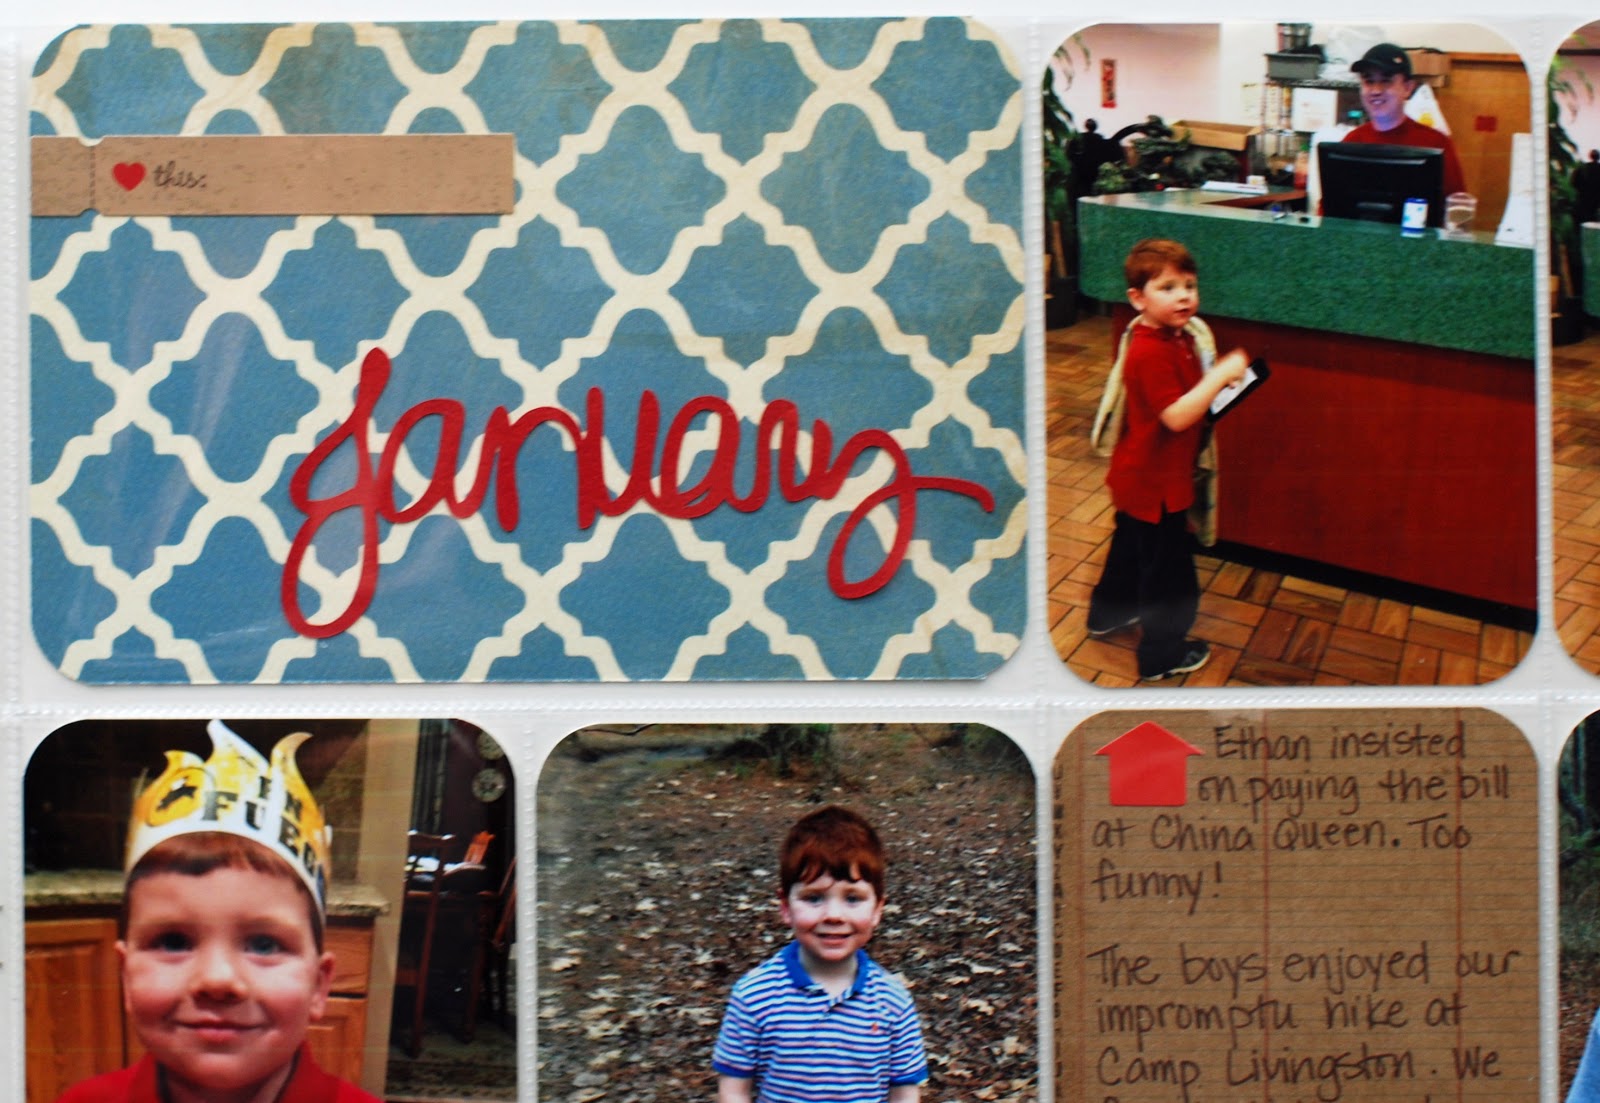
For the title and my first week's spread, I used Becky Higgins' Design A page protectors and the Fancy Pants The Good Life kit.  How perfect is the little banner that says "The Good Life" for a title for my album.  Each patterned paper is cut at 6" x 4" and slides right into the pockets.  Each photo is cut at 3" x 4".

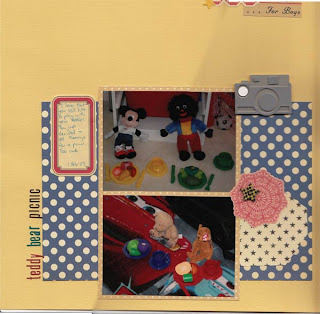
Week One, January 1-7


Most of the pictures in this spread were taken one day at the park.  I really loved those photos, so those are the ones I added the most of.  I also scanned in a note that my oldest wrote to my youngest and printed out a Google image of a movie poster.  Since most of my pics were vertical, I printed them using THIS video tutorial for putting two 3 x 4 images on a 4 x 6.  


For all the spots that did not include a photo, I cut patterned paper into 4x6 or 3x4 and embellished with journaling and the die cut tags that came in the kit.  The banner on the title card was created from the Fancy Pants Good Life stencil card and backed in cardstock.  A little twine tied on the end and that's it.


I printed all my journaling cards on the light gray cardstock that came in the kit.  I also used the Pink Paislee mini alphabet stickers to add my week and my American Crafts date stamp for the week.  You can find a date stamp HERE in the store.

Week Two, January 8-14


For this one, I still used Becky Higgins' Design A page protectors but with the Simple Stories Snap line.  Another thing I love about Project Life is how colorful the pages turn out.  I can let go of obsessively matching pictures with papers because the variety of colors just seems to work.


Most of the embellishing for this spread comes straight from the  Simple Stories Snap 12 x 12 sticker sheet.  I did add a couple of die cuts and stickers from my stash.  


These white grid journaling cards are Becky Higgin's.  You could just as easily use plain white cardstock that you cut down to size.  The stickers are from my stash.

So, are you in?  Do you wanna give this project a go with me?  If so, all you need for supplies are some divided page protectors (check out THESE in the TSR store), your Flavors of the Month kit, and your pictures.  If you have any questions, please leave me a comment.  

I'll be back soon with Weeks Three and Four created with Pink Paislee Portfolio and Carta Bella Traditions.  Hope to see you then!

Monday, January 7, 2013

It's All In the Details: January

Let's take one more look at the January kits before they get into your hands... yes, I'm teasing you.  A little.  Like these details!  Little touches here and there that add up to make great layouts.  Enjoy!

Aphra created simple flowers that are absolutely beautiful.  Paper, button, twine... that's all you need!  Die cut, punch, or free-hand the petals, crease them, and assemble.  Instant bouquet!
Beth distressed her cardstock & alphas - this is a great way to add a unifying color (white in this case) to your elements.
Jenny added a nice embellie cluster to her layout - and then kicked it all up a notch by adding white ink dots around the whole thing.  The ink acts as another visual layer - but without the extra bulk.
Melanie's got great details here... tiny staple, cluster of flowers, black ink line, inked banners.  The next time you think your layout is missing something, try adding one - or all - of these things!
My title tag became a great little focal piece.  Little bits of the rest of the kit coordinated with the rest of the layout... and the white space kept it from getting "lost" in the background paper.
Aphra ran short of embellishments - so she made her own!  Die cuts from coordinating paper topped with some eye candy add a lot to this layout.
Beth chose the perfect mist for this layout.  It's kinda grey, kinda blue... maybe green?  Doesn't really matter, since it would coordinate well with any of those colors - just like it does here.
Melanie uses the seriously adorable staples again - to attach this seriously adorable fabric tag.  It's not quite squared up to the rest of the layout, which catches the eye.  Clever!
I distressed my photos and paper to bring more white - and a snowy look - to my layout.  And if your paper has great border details, you can showcase them under a peek-a-boo flap.
- Theresa/Savi