Wednesday, February 29, 2012

Last of the March Sneaks and a Reminder!!

And here are the last of the March Sneaks...

4 by Brenda

Too Silly by Frances

Don't forget that today is the last day to submit your layouts to our Monthly Sketch and Freaky Fast Challenge. You can check out the deets in our sidebar. Good luck!! Also, check out the announcement below in the previous post...TSR is having a Leap Day Sale!! Whoot! Whoot!

LEAP DAY SALE!

When something only pops up on the calendar once every four years, it deserves some extra attention! So, we're celebrating "LEAP DAY" at The ScrapRoom with a special sale! You've got two options for some great savings!

**Save 20% off the listed price of any one item in our ScrapRoom Store. (This item CAN be combined with the upcoming March shipment for TSR Members - so you won't have to pay any additional shipping charges.)
**Get FREE SHIPPING on any order over $75.00 (after discounts) that ships out this week (before the March shipment).

Visit our ScrapRoom Store NOW for the best selection!

Leap Day Sale Terms:
*Use coupon code LEAP in the comments section when placing your order.
*Discount will NOT appear in shopping cart total when placing your order. We will adjust the total manually BEFORE processing your credit card.
*The two offers above CAN be combined. We will take 20% off of the most expensive item on your order if you are placing an order of $75.00 or more. ($75.00 minimum still must be met after the discount is applied.)
*Coupon cannot be applied toward any new March Club Kits, the new March Venti Kit or any previously ordered items.
*Coupon only good on orders placed 2/29/12 and 3/1/12.

Saturday, February 25, 2012

March Sneak Peek #1


Echo Park Paper This-n-That Charming Layout Kit by Tammy Harp (March Doubleshot Kit)

P.S. This is also my take on this month's Freaky Fast Formula for 8.5x11. :)

Thursday, February 23, 2012

Photo Sleeves + ScrapRoom Kits = LOVE!

Hi All! It's Tammy here with another edition of Project Life, completed with ScrapRoom Kits! I tried the traditional photo-a-day (Project 365) back in 2010. It was a rather overwhelming task to document the mundane of everyday life. I'm glad I did it, but since our family is still rather in that same life stage, it's not exactly the ongoing scrapbooking style that I was looking for.

However, I do like the idea of scrapbooking with photo sleeve protectors sometimes instead of always feeling like I have to do fully-designed 12x12 or 8.5x11 layouts. The smaller photo-sized spaces are less intimidating than a large page, and I thought it would be fun to be less formal and more random with some of my layouts, so I decided to give this style of scrapbooking a try this year.

Right now, I'm not ready to commit to completing a weekly Project Life layout, but I am going to try my hand at a monthly highlights page. I will be using this photo-sleeve-style of scrapbooking to document a month of highlights on a 2-page spread throughout 2012. With all of the different styles of photo sleeves available now, I'm looking forward to trying lots of different photo configuration. I am also embracing the challenge to be more of a "Free Spirit" with these photo-sleeve layouts - Less structure, Less Perfection, More of life's ephemera, and More random elements that make me happy whether they "matchy-match" with the photos or not.

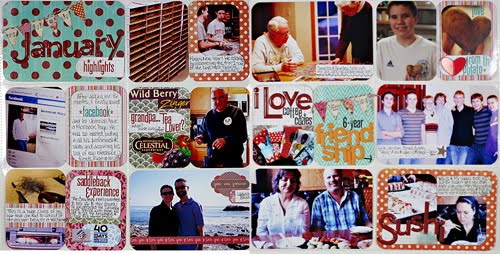
So, here is my "January Highlights" 2-page layout... I used the Style A photo-sleeve protectors from WRMK and the February Flavors of the Month Kit, along with some additional alphabet stickers and that adorable 3-D heart from the February Embellishment Kit. (all items available in our ScrapRoom Store)


And, here's a bit more of a breakdown of some of my favorite elements and a few things I'm learning about this process...
Here is the left page of the layout. I am using photo-sleeve protectors that have (6) slots for 4"x6" horizontal photos. You'll notice that I have some 4"x 3" elements - some photos and some journaling cards and some that are a combination of photos and journaling. I like using this smaller size to separate different events and/or stories on my "highlights" page. Since many of the photos on this layout are not connected with one another, I liked being able to separate photos and events by creating these smaller cards. I did tend to group (2) connected items together in one photo-sleeve if I could, and I enjoyed using (1) 4"x 3" photo next to a corresponding 4"x 3" journaling card. I also found that I enjoyed occasionally adding an additional photo onto the corresponding journaling card if I had room.

Here is an example of a 4"x 3" photo with a corresponding journaling card next to it. I was able to use some ephemera on this card by cutting out some of the elements from the box of teabags. In order to add a bit of actual journaling, I cut out a small piece of grid paper, rounded two corners and added it to the center of the card. You'll see that I used this same technique on several of the journaling cards throughout the layout.

One thing to note... because of the limited size of the photo-sleeves, I was not able to do a lot of story-telling to accompany any of the photos. (I will be adding longer stories to the back of my 2012 album - but that is a post for another day. :) ) Normally, I like to add a lot more details to my journaling, so I have to keep reminding myself that these monthly layouts are designed to just hit the highlights!

I added the border strip and die-cuts from the Jillibean Soup layout kit (also in the February Flavors of the Month kit) right on top of my photo. I never do that, so this is me embracing my "less structure - more random" philosophy!

Now, for a close-up of the right page of my layout:
I had one extra slot available after I decided what photos I wanted to include on the page, so I added the photo of my coffee cozies fanned out, along with a fun "I Love coffee cozies" title above the photo. I love the way it turned out. You'll also note that I used a lot of the mini alphabet stickers from LilyBee Designs. You will find (2) colors of these awesome alphas in your February ScrapRoom kit. I just cannot get enough of these. They are the perfect size for smaller subtitles, the font works with everything, and the colors are oh-so-yummy!

I also jumped outside of my scrapbooking comfort zone by adding regular ol' Avery label stickers right on top of my photos. I'll be honest, the archival-purist in me was screaming for me to stop, but I reminded that little nay-saying voice in my head that the original photo is stored on my computer if I ever needed to reprint it - and I proceeded to stick that sticker right on top of my photo, so adding a bit of context was easy. It was the sweet taste of freedom, my friends!

Here is one final close-up from this month's layout, and yes, we did actually find this heart-shaped potato in our pantry, and we wanted to document the love before we ate it. But, while that heart-shaped potato is cute, did you see how cute that 3D heart sticker is? I couldn't hide all of that 3D goodness inside the photo-sleeve, where nobody would be able to see it fan open and wave all of that cuteness at them, so I adhered it to the outside of the photo-sleeve protector. (Again, that is me embracing my "less structure - more fun" philosophy.)

And that concludes my January Highlights photo-sleeve page edition. :) I'm pretty stoked because I believe that the perfectly proportioned size of our ScrapRoom Layout Kits are designed to complement this Project Life/photo-sleeve scrapbooking like no other type of kit on the market today. With our Flavors of the Month kit, you get (4) layout kits - perfect for documenting (4) week-in-the-life layouts each month. You'll never get bored with too much product or with your layouts all looking the same, and you'll have enough goodies to complete other layouts and projects in addition to your Project Life pages.

If you have Project Life or completed photo-sleeve scrapbook pages that you'd like to share, be sure to leave a link in the comments section below. We'd love to see how you're documenting your life in your scrapbook pages!

Wednesday, February 22, 2012

Project Life at TSR!

Hello there friends! And yes, we are on the Project Life train! Whoot! Whoot! Really, how can you not be? It is the most NOT fussy kind of scrapbooking around. You can do it every week, every couple of weeks, or every month! Basically, anything goes!

When I first heard of Project Life, I was like "no way!" Take a picture everyday...complete a layout every week...buy MORE scrapbook supplies to make an additional album...really? No thanks. But as I researched more and more, I realized that I could make it anything I wanted! I decided, quite quickly, that a pic a day or a layout a week was not going to happen. Hello? A full-time job, a busy hubby, 4 kiddos, homework, house work, ballgames...get the picture...NEVER! But I did know that the once a month bit, was certainly doable! These are the things I LOVE and that work for me...

1. It is a no fuss way to scrapbook! The sizes are already derived for you and all you do is crop your pics, crop your scraps for where you don't have pics, add journaling, and embellish...EASY!

2. The photo sleeve protectors. There are TONS of layouts! I am using We R Memory Keepers Protectors and there are so many different arrangements. Tammy is a Project Life lover too, and she has most of the WRMK Photo Sleeve Protectors in the ScrapRoom Store!! No kidding!! You can check them out HERE.

3. Quick turn around for documenting your memories. I am behind in my regular scrapbooking and I find myself forgetting the details sometimes. But with Project Life, I can certainly remember the details on a month-by-month basis.

4. Stash buster!! Gotta LOVE this aspect! It makes me so happy to be able to kill a TSR kit after I have scrapbooked my regular layouts!

Here is a look at my title page using February's FOTM kit and a Style D WRMK Protector...


And here is my January layout using February's FOTM kit, a Style D WRMK Protector, and a Multi-Pack Protector...


Well, that's it for this month! I will be back next month to share my February layout. Be sure to check back tomorrow...Tammy will be here to share her Project Life method and layouts!

Happy Wednesday!

Monday, February 20, 2012

Design Team Inspiration with Melanie!!

Garland is the "new banner" this CHA season. I saw quite a few lines with garland and I LOVE it! I created my own garland for two of my layouts this month.


I created a little tutorial on creating your own garland. Please ignore the fabric dust on my sewing machine...I need to clean it :)

Step 1: Fussy cut out hearts and punch out desired shapes

Step 2: Increase the stitch length on your sewing machine. Length 3mm works great for my machine.

Step 3: Insert first heart under foot, in front of needle. The press needle down.

Step 4: Chain stitch hearts and punched circles. Do not stop stitching between pieces.

Step 5: Garland is done. Enjoy!


Be sure to post your garland projects in the gallery!

Melanie

Friday, February 17, 2012

Freaky Fast Inspiration

It's Friday...Freaky Fast Friday!! And I am just loving the inspiration that can be found in the TSR Gallery. Take a look...


Andy's Frozen Custard by ZoezMom


Hey! by Savi
Don't you love the different variations of this month's formula! These 2 ladies totally rocked it! Don't forget that you have to Wednesday, February 29th to get your layouts posted HERE.


Have a great weekend!!

Thursday, February 16, 2012

Design Team Inspiration with Aphra!

Hiya ScrapRoom friends! For my inspiration post today, I wanted to share a technique for making your own diecut butterflies. You'll need paper, a pencil, chalk, and a button.

First, cut your paper down to a smaller size and fold it in half. Draw a half a butterfly along the seam. If you think you might need to erase several times, then draw on the wrong side of the paper.


Cut out your shape and open up to reveal the butterfly. You can trim down the butterfly until you like the way it looks.


Ink the edges with a similar but slightly darker-colored chalk. If you don't have a close enough color, you could also outline the butterfly.


Finally, embellish the center of the butterfly with a button or other circular object.


Here's an example of a couple of butterflies that I created for one of my layouts for this month's gallery.


Can't wait to see your big, beautiful butterlies! Happy scrappin'!

Monday, February 13, 2012

We LOVE the February Stamp Set!!

Well, hiya. It's Monday. *sigh* I'm not sure if you remember or not, but on February 1st we showed off ALL of the new goodies in the TSR store...the FOTM kit, the DS kit...remember? And at the very end of the post, I showed off the Stamp Set for February. Let me jog your memory...

Now do you remember? Aren't they just about the cutest things you've ever seen?!?! Well, they are, and our Design Team did a super fab job using them this month! Take a look...

Love Card by Jenny

1 in a Million Card by Aphra

Little Sun Beam by Melanie

Be Mine by Jenny

Hot Stuff Card by Melanie

Now what did I tell ya? Ca-ute, right? If you have not had the pleasure of having one of the EXCLUSIVE TSR Stamp Sets, you can get your hot hands on one HERE.

Hope you have a great day...I'm off to dream about Friday! *sigh*

Friday, February 10, 2012

It's Freaky Fast Friday!!

Well, hiya...it's Friday....it's Friday! I'm doing my happy dance by the way!! LOL!!

I'm here today to share my 2nd layout using February's Freaky Fast Formula. Just in case you forgot, here's a reminder...

1. Cardstock or Patterned Paper Background
2. 9-3" X 3" patterned paper

No, I'm not kidding...that is it!!

And here are the steps to completing a layout using February's formula...

1. Collect a few pics.
2. Cut your patterned paper to the dimensions stated above.
3. Push the paper around your cardstock till you achieve the look you want, or simply copy my layout below!
4. Adhere and EMBELLISH! It is that easy!!

Here's a look at my 2nd Freaky Fast Layout for February...

Wrapped in LOVE


Again, this layout came together sooooo quickly! I used the Jillibean Soup Hearty Barley kit from the Flavors of the Month kit. This layout only took 30 minutes!! The major difference between last week's layout and this week's layout, is that I incorporated pics into my grid. Like I said the possibilities are ENDLESS!!

Don't forget that if you create a layout using this month's formula, all you have to do is add your link to this post HERE by Wednesday, February 29th. Our design team will then choose our favorite, and one lucky lady will win a $10 gift certificate to our TSR Store!
Link
Have a great weekend!

Thursday, February 9, 2012

LOVE is in the Air!!

Hello, it's February! And you know that totally means L-O-V-E!! Here are some "lovely" little things that I have spotted on Pinterest recently...


If you are needing a bit of Valentine's Day inspiration, just log into your Pinterest account and search for "Valentine's Day." And get ready to be on L-O-V-E overload!!

Happy Thursday!