Saturday, March 30, 2013

Sneak Peek #6: Elle's Studio You & Me (FOTM)

Love by TSR Designer, Melanie Call
"We are super excited for this beautiful line which contains pinks, blues, kraft, and chalkboard!!  This collection is perfect for you and the ones you love." -- Elle's Studio blog

Friday, March 29, 2013

Sneak Peek #5: Echo Park Paper Oh Brother (DS)

My Boy by TSR Guest Designer
"This collection is designed for that special relationship between siblings and brothers. This collection works well for teenagers and toddlers alike." -- Echo Park Paper blog
So did you catch that?  Yes, that's right... we've got an awesome guest designer here at The ScrapRoom for the next quarter!  Do you recognize her style?  Can you guess who it is?  We're all super excited to have her on board with us, and we think you will be, too.  Now reveal day is just a smidge more exciting, if that's even possible.  *big grin*  You'll get to check out more wonderful pages in the gallery and find out who our new designer is.  And then... come back on April 3rd for an interview and get to know her better! *squeal*

Thursday, March 28, 2013

Sneak Peek #4: Studio Calico Here & There (FOTM)

Project Life "April 2012" by Aphra Bolyer
"Pack a bag, grab your camera and hit the road with the Here and There Collection. Playful, hand-drawn patterns and icons display the details of treasured adventures in an organic color palette, including burnt orange, deep blue and crisp, apple green. Go Here and There and everywhere, satisfying your creative wanderlust." -- Studio Calico blog

Wednesday, March 27, 2013

Sneak Peek #3: Teresa Collins He Said/She Said (FOTM)

"Rock the 'Stache" by Jennifer Moore
"I had in my head that I wanted a line that was youthful, ageless and fun! I wanted a collection that was for both girls and guys. The collection is so versatile. I love the richness of color." -- Teresa Collins

Tuesday, March 26, 2013

Sneak Peek #2: My Mind's Eye Unforgettable (DS)

"Hobo" by Theresa Sovacool
"Unforgettable is vibrant, sweet, romantic, and trendy all rolled into one.  Unforgettable is made up of pinks,yellows,blues and browns and is the perfect mix of geometric and floral." -- My Mind's Eye Blog

Monday, March 25, 2013

Sneak Peek #1: Crate Paper Maggie Holmes (FOTM)

"Loved" by Melanie Call
"We are so excited to have collaborated with Maggie to bring her style and Crate Paper's together. She has a vintage, eclectic and oh so very cute style that we know you are going to fall in LOVE with. Maggie is an amazing scrapbooker and photographer that shines through in all of her beautiful layouts and projects. We are so thrilled to welcome Maggie into the CP family and hope that you enjoy her new collection" -- Crate Paper Blog

Wednesday, March 20, 2013

Project Life: Weeks 11 and 12

Hi there scrappy friends!  Today I'm sharing my last two weeks of Project Life for March.  For Weeks 11 and 12, I used the March Project Life Add On kit.  The first spread is mostly Dear Lizzie's Lucky Charm papers and embellies and the second spread is My Minds Eye's Documented.  And thanks to the pre-cut papers, both layouts came together quickly, which is the best part of Project Life for me.

Week Eleven


Week Twelve


Oh, and did you notice?  That last card is based on the March PL Sketch.  When I find a layout that I like, I use it.  A lot.  And that, too, makes my pages come together pretty quickly.

I hope you are still enjoying and keeping up with Project Life.  Now that my March layouts are completed and in the album, it's time to start working on April.  If you are interested in my Project Life process, check out THIS POST at my blog.  And if you have any tips on how you complete your Project Life pages, leave us a comment.  We'd love to hear. 

I Challenge You...

I'm sure you are aware of The ScrapRoom Sketch Challenge we do every month (but if not... take a look at the sidebar on the right).  Did you know that there are lots more challenges on our Message Board?  And just like our Sketch Challenge, you'll find these challenges are just the thing you need to "get more pages done"!  Check out what's cooking this month with our Mods and members:

Sideways Title by TerryB:
Just as simple as it seems - use a sideways title on your layout!
"12 12 12" by TerryB - and yeah, I'm totally lifting this one for my 12/12/12 pictures!
Scrappy Challenge by TerryB:
Create a layout using a Design A page protector as your inspiration.  You can follow it exactly, use one side, or even use a strip of pictures down the middle of your page - however you want to interpret the design!
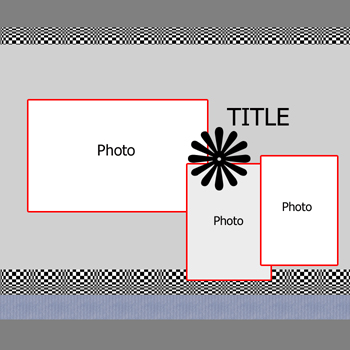
Inspiration:  Design A page protector
Choose Your Own Challenge Challenge by TerryB:
Choose one (or more) things from the list below, and do a layout.
  • big title
  • lots of pictures
  • double page layout
  • print/journal on patterned paper
"Gus Macker Toilet Bowl Champs" by TerryB - and she got all four items on this layout... extra credit?
Go Green by trish70:
In honor of St. Patrick's Day, complete a layout this month in greens!
"Casper" by trish70 - love how she jumped in and threw down the (green) gauntlet!
St. Patrick's Day Challenge by TerryB:
This is/was a two-part challenge:  List three things that you think of when you think of St. Patty's Day... And now, pick one thing on your list, and use it as inspiration for a layout. It does NOT have to be about St. Patty's Day.  And the best part?  If your list isn't motivating (or you didn't have a list before last weekend), feel free to borrow from someone else's list!
"Celebrate" by TerryB - she used the word "lucky" from her list
These are wonderful challenges... and you can still play along!  Click the challenge names to see the details on the Message Board and - most of all - just have some fun with it.  Oh, and a little birdie told me that there's a new challenge in the works - I think you'll really like it.  *wink*  Be sure to stop by the Message Board next Monday... and get ready to make paper bits fly!

- Theresa/Savi

Monday, March 18, 2013

How Melanie Created Her Layout

I loved this month's Dear Lizzy line...especially the "Love You" paper. Here is a little step by step on how I created my layout this month.

Step 1: Gather all the lovely goodies up.

Step 2: I liked how I laid out my pattern paper in the picture above. So I copied this and created my background. I did cut the "Love You" paper out horizontally so you could read the words.

Step 3: I start arranging the pattern paper pieces onto the heart pattern paper. I did want one word of "punched out" journaling card to stand out. So I placed a piece of the striped pattern paper behind the word "heart".  I also added some chevron arrows along the right side of the layout.

Step 4: Then I placed my photo on top of the pattern paper pieces (I forgot to take a picture of this). Next came time to use all the lovely embellishments included in the FOTM and embellishment kits.
Washi, chipboard butterfly, enamel dot
Chipboard arrows
Fabric tag and chipboard heart
Step 5: My finished layout:

I hope you liked this little step by step on how I created my layout!

- Melanie

Wednesday, March 13, 2013

Washi Picture Frame with Jenny

This month, I was able to use the included Washi tape for a home decor project!  I have recently started trying to redo some of our living room decor with a grey/yellow/white theme, so when I opened my Scrap Room box this month and found not one but TWO beautiful rolls of Washi tape (which happened to be grey and yellow), I knew I had to create something for my home.

I had a small canvas panel leftover from a previous project.  This canvas is only 8x10", but it was the perfect size for what I needed.  I got these canvas panels in a 3-pack from Hobby Lobby...I purchased them a while ago, but they were very inexpensive.  I used my Washi tape to cover the canvas panel, alternating strips of the yellow tape with strips of the grey tape.  No math needed...I just aligned the first strip of tape with the edge of the canvas and continued lining all the strips of tape up against each other.  If there was any extra hanging off the edges, I just folded the tape over the canvas and stuck it down really well.  I then went over the whole canvas with some Mod Podge to seal the Washi tape into place. (I've heard Washi tends to start peeling up after a while.)
Then, I had this cute little bare frame that I had picked up MONTHS ago from the dollar spot at JoAnn's:
I spray painted it with high gloss white spray paint, and that's all I had to do!  I then add my black and white photo inside the little frame, applied some Velcro to the back of the frame (so that I could change out my picture whenever I want to), and applied the small frame on top of my Washi canvas.
The end product:
I had to add a little plastic hanger on the back of the canvas, and now this 1-of-a-kind piece of handmade artwork hangs in my home for all to see.

Washi tape isn't just for scrapbook pages....use it for those personal home decor creations as well!  It's so simple and quick to use...and I totally LOVE the colors and patterns included in this month's kit.  What are you doing with your Washi?

- Jenny

Monday, March 11, 2013

Project Life: Week 10

Hi there Project Lifers!  Can you believe it's Week Ten already?  So glad that I have this project to document life because it just never seems to slow down, does it?  Anyhoo, here's this week's spread.  (Click on any of the images to enlarge.)
Week Ten


This one was created with the Studio Calico papers and embellishments that came in the Project Life Add-On kit.  Several of the cards said Hello on them, which I thought was a perfect match for the picture of my kids yelling to hear their echoes at the Nature Preserve.  In fact, all the pictures in this spread are from that day trip.  It's so nice that this project is so flexible!

This week was another quick and easy page because of the Add-On Kit and because of the sketch below.


I noticed that I've used this layout for several of my title and journaling cards over the last ten weeks, so I thought I'd create a sketch for you to keep on hand for your Project Life pages.


For one of my 3x4 filler cards, I added a metal flair.  LOVE those!  To keep my page protector from puckering up too much, I flattened it out a bit around the edges.  It still has some dimension to it, which I like.


For the picture below, I used a portion of the map from the website of the Nature Preserve we visited.  It was so easy to save it as a picture and upload it to WalGreen's with the rest of my pictures.  Great filler, too.


Well, that's it for this week.  See you next week with Week 11 and some tips for managing this whole process.  In the mean time, if you use the sketch, I'd love to see what you do with it.  Leave me a comment, and I'll come take a peek.


Friday, March 8, 2013

Weekly Planner with Theresa

Did you notice that there's a piece of planner paper in the Elle's Studio Day to Day kit?  My ultra-nerdy inner planner absolutely squealed when I pulled this out of my TSR box:
Elle's Studio Day to Day:  Schedule
I set it aside.  And planned to pick up a white frame the next time I was out.  This baby was going on my wall!!!

Here's how it turned out - and I loved how I could sketch out my week ahead of time.  Perfect timing, as the week I got my paper was a week I spent at home.  Turns out I can't really handle a lot of unstructured free time.  LOL  This saved my sanity and kept my marriage together, I'm sure!

Want to make one too?  Easy peasy... just grab a 12x12 frame the next time you're out, and maybe some clips (if you don't have something in your stash that you can use).
Attach the clips to the bottom of the frame with short screws.  Making pilot holes is a pain, but it really does make a difference. 
Find some large brads and trim the ends off - just short enough that you can't see them when the brad is attached to the clip.
All my brads are trimmed and ready to be attached to the clips!
Brads attached.  Serves no purpose other than being pretty.  But that's good enough for me!
I write on the glass with a Sharpie and wipe it off with a cotton ball soaked in rubbing alcohol.  You could use dry erase markers or water-soluble markers, too.  I just like that a random boybarian can't easily erase letters and make naughty words on my schedule.  *grin*
- Theresa/Savi

Wednesday, March 6, 2013

Project Life: Keeping It Simple in Week 9

Ok, so by now I'm sure all you Project Lifers have seen the brand spanking new Project Life Add On that Tammy rolled out this month, right?  Not only is there an awesome mix of product at a very good price, but it is also an amazing time saver.  Everything came pre-cut at 4x6.  I LOVED it!  The hardest part was deciding which paper line to use first.  Since my Week 9 photos included lots of red and blue, I went with the Echo Park Your Smile collection.  Here's the whole spread (click on the image to enlarge).


The Add On came with many 3x4 cards to choose from.  Some filler and some with room for journaling.  And the best part was that I just had to make one cut and then round the corners.

For my title card, I added a paper strip to one of the 4x6 cards that came in the kit.  Then, I layered on a couple of Echo Park stickers from the Flavors of the Month kit.  How cool that they coordinate???  The yellow Thickers are from my stash.  


For my weekly review card, I decided to fill in the "How I spend my time ..." card with mini alphas that came in the kit.  I thought my kids might like to look back on how I prioritize my week.  Ok, so this isn't exactly how I allocate my time, but I sure would if I could.  


As you can tell, this week's layout is super simple.  I didn't feel the need to embellish much because the papers were already so fun.  And it was super fast . . . thanks to the new Add On kit.  

See you soon with my Week 10 spread and a Project Life sketch.  Oooo . . . that's new.  Ha ha!


Monday, March 4, 2013

The March ScrapRoom Sketch... and February's Winner!

Another new month brings us another new sketch by Tammy!  As you can see, we think this sketch is wonderfully versatile:

March Sketch by Tammy Harp
"Fun In the Sun" by Brenda Carpenter
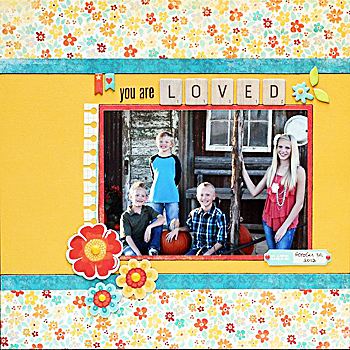
"You Are Loved" by Jennifer Moore
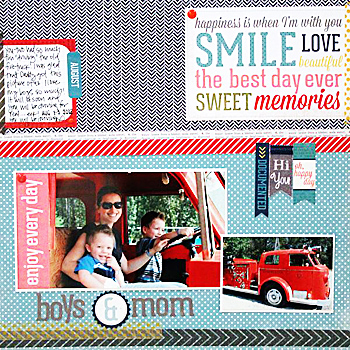
"Boys & Mom" by Melanie Call
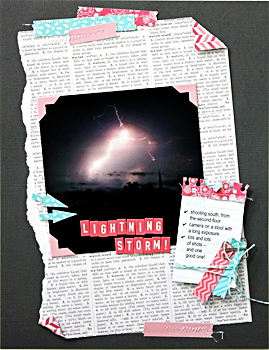
"Lightning Storm" by Theresa Sovacool
Whether you follow the sketch exactly or just let it guide your photo placement... whether you layer on patterned papers or keep it simple ... we want to see how you've been inspired by the sketch this month!  Give it a try for a chance to win a $10 gift certificate to The ScrapRoom Store.  Just link up your take on our sketch in the comments below. 

And speaking of The ScrapRoom Store, we have a lucky winner again this month!

The February Sketch Challenge winner was randomly chosen to be Trish Alexander with this luscious, masculine layout... that makes me giggle every time I look at it!  What a priceless photo, and the pop of red is spot-on. 

Congratulations, Trish! Please email Tammy at admin@scrap-room.com with your real name, address, and the name of the contest you won. She'll get your prize to you right away. Happy shopping! Don't forget to link up your sketch layout for your chance to win a shopping spree next month. Good luck, and have fun with it!

- Theresa/Savi