Friday, November 30, 2012

Sneak Peek #6: Simple Stories Handmade Holiday (FOTM)

"Shock & Awe" by Jennifer Moore
 "Handmade Holiday is full of warm thoughts, well wishes and simple handcrafted designs - so gather your Christmas keepsakes and memories to add to this homespun holiday collection! From fabric-inspired mix-and-match plaids, ginghams and checks to handcrafted touches like muslin, kraft, stitching and more, Handmade Holiday is all you need to create a simple, cozy Christmas!" -- Simple Stories blog

Thursday, November 29, 2012

Sneak Peek #5: Crate Paper Sleigh Ride (FOTM)

"Christmas Kisses" by Beth Hallgren
"Our new Sleigh Ride collection is the perfect line to celebrate with this winter. The adorable color palette will make your winter and Christmas projects cheery & bright." -- Crate Paper blog 

Wednesday, November 28, 2012

Sneak Peek #4: Bo Bunny Snow Day (DS)


"Winter Crafting" by Aphra Bolyer
"This collection is so versatile, so you could use it for anything, not just snowy pics." -- Bo Bunny blog

Tuesday, November 27, 2012

Sneak Peek #3: My Mind's Eye All is Bright (FOTM)

"Santa Visit" by Melanie Call
"This collection consists of neutrals with pops of red, blue, and green. Touches of ephemera and days gone by are coupled with current trends. And they blend beautifully." -- MME blog

Monday, November 26, 2012

Sneak Peek #2: Echo Park This-N-That Christmas (FOTM)

"You're Never Too Old For Santa" by Jennifer Moore
"The "This & That Christmas" collection's warm wood tones, traditional colors, and vintage elements offer the same beautiful styling as previous lines, but with a holiday twist." -- Jessica Sprague website

Sunday, November 25, 2012

Sneak Peek #1: October Afternoon Midway (DS)

"Timeless Easter" by Theresa Sovacool
"Fall head over heels for Midway's vibrant colors and playful patterns. This line is perfect for carnival and amusement park photos, for capturing children (and even grown-ups) at play, and for creating a sense of energy and motion on the page."  -- October Afternoon blog

Friday, November 23, 2012

Melanie knows what to do if you love both sides...

Each month in our kit, there is always at least one sheet of pattern paper that has two AMAZING sides that I must use. Of course the easiest way to fix this is: order 2 kits :). Since that may not be in your or my budget, I try to cut pieces of the "backside" out to use on my layout or cards.

When creating my sneak peak layout, I loved the Take a Hike pattern paper...leaves on side A and woodgrain on side B. I knew I wanted both sides on my layout. So below is what I did.

Step 1: Admire the paper a bit more :)
2. Decide which side will be your background (woodgrain for me). Place photos on paper. Lightly trace with pencil around photo edges.


2. Trim about 1/2 inch inside of pencil line (remember you need to be able to adhere the photo to the back ground paper)

3. You now have the backside of the pattern paper to use!


4. Finish your layout using both sides of the pattern paper and feel like a smarty pants.


Now go and enjoy both sides of your paper!

- Melanie

Wednesday, November 21, 2012

Scraplifting with Jenny!

Let's face it...sometimes, your mojo runs out and scrapbook page ideas just don't come to you. No matter how creative you want to be, you sit there and stare blankly at your kit, wondering what to do with it or where to start. Sound familiar? It happens to even the most creative scrapper. Inspiration dries up, and the ideas just aren't flowing. What do you do when this happens? My favorite method of combating lack of mojo is to either look for a good sketch or to simply find another person's page that I like and "scraplift" it! Scraplifting isn't a bad thing. It doesn't mean YOU aren't being creative...I mean, YOU still have to coordinate the materials and put the page all together, right? Take no shame in scraplifting! The Idea Gallery at The Scrap Room is one of the first places I look for some ideas when I'm struggling with creativity. There are so many wonderful pages and projects there...I dare you to look through some of the past kit ideas and not be inspired! :) Here are some of the top pages on my "to scraplift" list:
Harvest Memories by Brenda Carpenter, October 2012 Idea Gallery
Art Fair by Beth Hallgren, September 2012 Idea Gallery
My Guys by Melanie Call, January 2012 Idea Gallery
Now, I could go on and on and on posting pages from the Idea Gallery that I want to scraplift!! So much inspiration! As the year starts to come to an end, I encourage you to look through the Idea Gallery at TSR and find a page or 2 to scraplift. After all, that's what the Design Team here at TSR is here for...to inspire you to GET MORE PAGES DONE! :) Happy Scraplifting!

- Jenny

Monday, November 19, 2012

Photo Assignment: Thankful Thing

So I bet you can figure out where the "thankful" part came from...  Those of us in the U.S. are gearing up for Thanksgiving and the holidays are quickly approaching for all of us (I will do us all a favor and not announce the number of days until Christmas).  *grin*

But why a "thing"?  Things aren't really what folks are focused on right now.  Right now it's all about family and friends and faith and building relationships and, well, all that stuff you give thanks for.  Which isn't stuff... or things... this time of year.

To prove my point, go to our Gallery and use the handy-dandy search function.  (Did you know that was there?  I use it when I'm stumped to get ideas!)  Try words like "Thanksgiving" or "thankful" or "blessing" or "Christmas" or "holiday" and you'll quickly see that we are all very, very good about documenting what is important to us.  Which is not stuff... or things... 

Except when it maybe *is* about the stuff and the things.  The stuff and the things that don't really get documented like they maybe should. To prove my point, pay attention to what people say this week and in the coming months: 

"Wow, this turkey looks amazing, Mom - it turned out beautifully!"
"Do you remember when we first got this ornament?"
"You know, this bowl I got from Aunt Elsie is pretty ugly, but I just can't have cranberries without it!"
"Can you believe that sunset?"
"Hey, do you think our tree fort is still there? Let's go look!"


And when you hear stuff like that... about things... grab your camera and capture the stuff and things that are part of our lives and traditions now, next week, next month, and always!  That's what the DT did this month:  we documented those everyday things that mean a lot to us, and that we are thankful for.

Jenny says:  "I am thankful for God's beauty!  This photo was taken during a trip to the mountains in Ruidoso, New Mexico."
Aphra says:  "I am thankful for our home. We love our neighborhood, and we feel blessed to have such a nice place to raise our family."
Melanie says:  "I'm so thankful for my sewing machine. I got my new sewing machine when I found out I was pregnant with my first son. I made my boys' first blanket and quilts using this machine...it even embroiders so their special blankets have their names on them (which they think is awesome). I love being able to give a handmade gift to friends and family. Plus I tend to stitch on most of my scrapbook layouts...I love to sew!"
Beth says:  "I'm thankful for my scrapdesk and my husband. He built it to look like a desk from the Pottery Barn catalog"
Theresa says:  "I'm so thankful for my glasses. All the things I love to do are dependent on my eyes, and I think one of my favorite phrases is "do you see that?"  I think about my glasses most, though, when we get those beautiful cold clear nights full of stars.  I can't imagine going through life not seeing them."
So now it's your turn to go out there and document your thankful things.  These photos would be a great addition to your Project Life, Month-in-Review, or calendar pages.  You may even be inspired to take more than one photo and make a layout about family traditions, treasures, or the little things you don't want to forget.  Feel free to share your photos, too - we all love ideas!  And speaking of ideas... we've got more ideas from Jenny and Melanie coming later this week.  Yep, I'm pretty thankful for that, too!

- Theresa/"Savi"

Friday, November 16, 2012

Mixing Paper and Water with Theresa!

Paper and water?  Usually a recipe for disaster, right?  Well, yeah.  Sometimes.  Maybe most of the time.  Even if you are going for brilliance... but that's a story for a little later.  *wink*

This whole tutorial is all about "going with it" or, more accurately "trying to figure out how the heck to recover from the really big error you just made with that paint/ink that glopped out all over the place."

Here's the first error.  I mean, masterpiece.  Oh, heck, I was panicking.  I admit it!
"The Wine Expert?" started off without the white paint, but had too much color and pattern going on - I wanted the focal point to be the picture (well, the wine bottle, actually).
Adding some white paint to tone it down was the plan.  It actually sort of accidentally turned out artsy and fun like I was hoping it might.  But I learned some things the hard way...
I started painting on some white paint and realized it was old and lumpy.  And gross.  And pretty much wrecked what I had going.  So I thought... "This is thick paper - I'm gonna go scrub it off!"  This is a picture of what it looked like after I scrubbed it in the bathroom sink.  Imagine also paint all over my hands and somehow on my forehead.
I walked away and let it dry overnight.  And then discovered I liked it, but it was too light.  So I grabbed some white stain and daubed it all over.  Oh yikes.  That's not looking good!
Squirt bottle of water to the rescue!  I got it good and wet and let it run all over... onto the good bathroom towel I grabbed the night before.  Oops.  Good thing I do the laundry around here!
So it ended up turning out with a lot of panic.  Maybe I should have, oh, I don't know... tried it on some scraps before I had a major disaster on my hands?  Yeah, that's what I should have done.

Too bad I don't listen to myself.  *insert laughter here*

I had successfully used a water/ink/grunge technique on this layout (it's the stripe print):

So I thought I would do the same with another piece for a card, but this time actually take pictures along the way and make it better and bolder!
A piece of paper heavily distressed and torn.  On a really crappy old towel.  See, I did learn something!
Thorough soaking courtesy of the squirt bottle (the dog hid downstairs during this step).
Crumpled up.
Un-crumpled.  At this point I should have just done what my CTMH consultant recommended years back:  iron it and love it just like this.  But noooooooo, I had to push it just a little too far.
Uh, yeah.  Does it look like I shot this paper?  I don't know why I thought brick red distress stain would look good, but I did.  I tried lots and lots of things and ended up just throwing this away (and staining my towel red).  Lesson learned... know when to stop and/or practice first!
Actually, the most important thing is a lesson I learned from my mother-in-law (who is an amazing artist, by the way):  there are many ways to wreck paper.  And it is *just paper.*  Turn it over or throw it away, there's always more. 

So try something artsy or outside your comfort zone.  And maybe practice a little.  And maybe don't reach for that brick red distress stain, okay?

- Theresa/Savi

Wednesday, November 14, 2012

Got Scraps Challenge!

In September, we focused on the power of 1" strips to kill some scraps.  I catch myself using that trick here and there and I hope you have, too.

So what's next?

Shapes.  Yep.  Punched or die-cut shapes.  The possibilities are endless!

Just like the Freaky Fast Formula and Page Starter, this challenge is designed to get you scrapping quickly and with a minimum of fuss.  You can do as much or as little as you like, in whatever style suits you.  And the best part... you just might be able to finally kill off some kits, or at least make a dent in that scrap pile!

Step 1:  
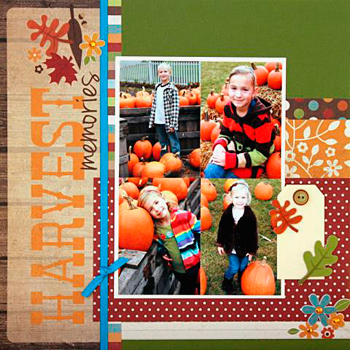
Find an almost-dead kit.  No kit?  No worries - go dig through your scrap pile and find some coordinating patterned paper scraps.
The last bits of Crate Paper On Trend
Step 2:  Grab your favorite punch or diecut and just start making shapes.  Don't worry about what shape you grabbed - it's your favorite, and it won't let you down!
Love this tab-shaped punch.  I seem to sneak it in on a lot of layouts!
 Step 3:  Find some pictures and cardstock to match your scraps.  
Pretty pink flower (and bumblebee!) along with some black, white, and green cardstock.
Step 4:  Shop your stash for the extra bits, like alphas, journaling blocks, and coordinating embellies. 
I'm a sucker for washi tape.  Did you know that?  *giggle*
Step 5:  Finish.  Make this layout your own.  Do your thing! 
Lots of layers and stitching - yep, that's definitely my style!

This took 50 minutes.  I killed a kit.  AND... I used some stuff out of my stash.  All with the power of my favorite punch. *love*

What?  You want to see it again?  Well, alright!  I just happen to have some October scraps laying around, so I'll show you how to do this with a different punch - and making a card this time!
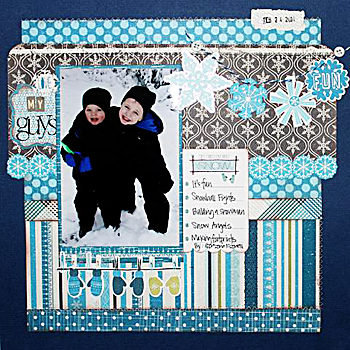
Step 1:  Find an almost-dead kit. 
Simple Stories Take a Hike... hmmm, not much left.
Step 2:  Grab your favorite punch or diecut and just start making shapes.
I think this zig-zag border punch is kind of manly, like these papers.  Plus, I like it!
Step 3:  Find some cardstock to match your scraps.
I had some grey cardstock left from the kit and added this pine green from my stash.
Step 4:  Shop your stash for the extra bits, like alphas, journaling blocks, and coordinating embellies. 
Hmmm... do you think I'm going to break out the sewing machine again?
Step 5:  Finish.  Make this card your own.  Do your thing! 
Still very much my style... layers and stitching.  Not your style?  That's okay!  Remember, this step requires you to do YOUR thing!
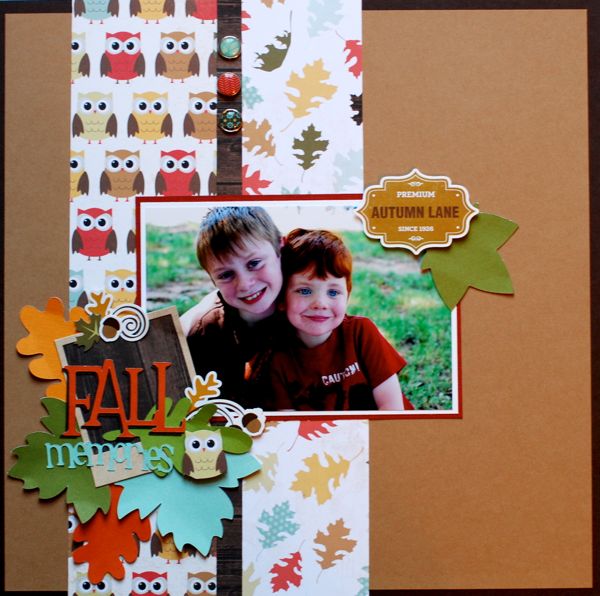
What?  One more?  Oh, for real?  Okay!  *smiles*

Here's the end result of what happens when patterned paper meets a leaf punch.  So many possibilities!
Yeah, yeah.  I still sewed on it.  But not so many layers this time!
Now it's your turn!  I challenge you to turn one shape into layouts this month.  You have until November 30th to link up your layout here for a chance to win a $10 gift certificate to the TSR Store.  Oh, and if you do happen to kill a kit - or four - stop by the Message Board and record it in our Kit Killer thread.  We're on our way to a goal of 225 dead kits by the end of the year - come help us out!

- Theresa/Savi

Monday, November 12, 2012

It's All In the Details: Doubleshot Kit!

Do you have your November kit yet?  Or are you still waiting for it?  If so, maybe today is your lucky day!

We all need lucky days, and having a lucky scrappy Monday is kind of a good deal no matter what!  Grab a cup of coffee and take a peek at what we've included on our layouts using the Doubleshot kit.  Then grab another cup, feel your mojo kick in, head to your scrappy space, and include some great details on your next layouts!

Echo Park Fall Fever detail by Aphra Bolyer
Echo Park Fall Fever detail by Theresa Sovacool
Crate Paper On Trend detail by Aphra Bolyer
Crate Paper On Trend detail by Theresa Sovacool

-Theresa/Savi

Friday, November 9, 2012

Aphra is Inspired By...

While trolling the web,  I fell in LOVE with this layout by Patricia Roebuck at the American Crafts blog.


I just knew I had to repeat the leaf effect on one of my layouts this month.  I used the Echo Park Fall Fever line, my Cricut, and the Simply Scarecrow cartridge.  Here's what I came up with.


I wish that I had taken the time to stitch down the center of my leaves.  While I was creating the page, I thought that crumpling them a bit would be enough texture.  But you just can't beat that stitched effect.  


I backed the die cut frame with some paper, covered up the word with a leaf, and then layered on a die cut title from the same cartridge.  To make the word Fall have a little more presence, I cut it out of two different colors and then offset it a bit.  

This was a quick and easy page with lots of layers and textures thanks to my inspiration piece and my Cricut!

See ya soon,
Aphra

Wednesday, November 7, 2012

It's All In the Details: FOTM Kit!

So it probably isn't very nice... or ladylike... to say it, but I will.  "Neener, neener!  I have my November kit already!!!"  Do you imagine me sticking my tongue out, too?  Let's just say it's not out of question...  *grin*

And now since I'm feeling a little guilty about acting like an immature 12-year-old (but I'm so good at it!), how's about I give you a close up view of what our DT did with the FOTM kits while you wait for your box to arrive?  Yeah, thought that would make you feel better!

Pebbles Seen & Noted detail by Beth Hallgren
Cosmo Cricket S'more Love detail by Melanie Call
American Crafts 5th & Frolic detail by Beth Hallgren
Crate Paper Acorn Avenue detail by Melanie Call
Pretty darn exciting, yes?  Your kit will be shipping soon, so maybe you should start clearing off your scrappy space and thinking about the details YOU are going to include on your next layout.  And if you are in need of a little inspiration, Aphra will be sharing an idea with you this Friday - stop on by and check it out!

- Theresa/Savi