Sunday, November 30, 2008

The ScrapRoom December Kits are now available!

Take a look at the December Flavor of the Month Kit!
Click here to join the Cafe Club "Flavors of the Month" Kit
Photobucket
KI MEMORIES FESTIVE: (upper left)
* 1 sheet Secret Santa Frosty Specialty Paper
* 1 sheet Gift Wrap (2-sided)
* 1 sheet Holly Jolly (2-sided)
* 2 sheets Bazzill Olive/OP
* 1 KI Memories Present Softie Clip
* 4-5 KI Memories Festive Chipboard Pieces (varies)

SCENIC ROUTE GARLAND
: (upper right)
* 1 sheet Garland Scrap Strip (2-sided)
* 1 sheet Howard Road (2-sided)
* 1 sheet Old Valley Avenue (2-sided)
* 2 sheets Bazzill Pomegranate
* 1 sheet Scenic Route Garland Holiday Memories Stickers
* 13-14 Petaloo Christmas Flora Doodle Flowers (varies)

LUXE CANDY CANE: (lower left)
* 1 sheet Mistletoe (2-sided)
* 1 sheet Wreath (2-sided)
* 2 sheets Bazzill Patch
* 1 sheet American Crafts Foil Accents Thickers (varies)
* ½ pkg. Kaisercraft Large Clear Self-Adhesive Rhinestones (17 jewels)

MAKING MEMORIES FALALA: (lower right)
* 1 sheet Skinny Stripe (2-sided)
* 1 sheet Geometric (2-sided)
* 1 sheet Scallop Circle Die-cut Specialty Paper
* 2 sheets Bazzill Barkley
* 4 Making Memories FaLaLa Brads (varies)
* 5 Making Memories FaLaLa Epoxy Shape Stickers (varies)
* approx. ½ yard Fancy Pants Green Ball Trim

Check out the Embellishment Club $10.00

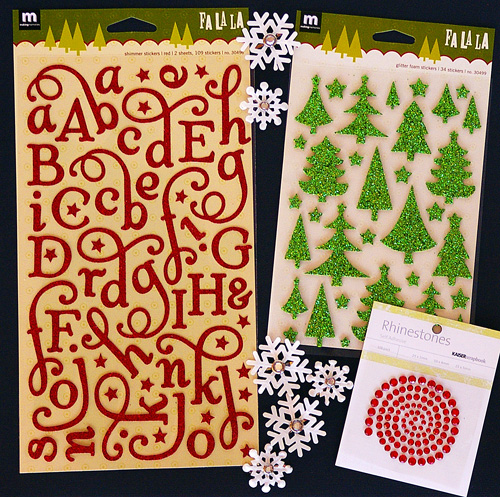
* 1 pkg. Making Memories Red Shimmer Alphabet Stickers (Glittered!)
* 1 pkg. Making Memories Glitter Trees Foam Stickers
* 6 Making Memories Paper Snowflakes w/ Crystal Brad Centers
* 1 pkg. Kaisercraft Red Rhinestones
Get our Embellishment Club Kit delivered to you each month automatically with your Cafe Club Kit! Click here to join the Embellishment Club


Here is the Patterned Paper Club $6.50


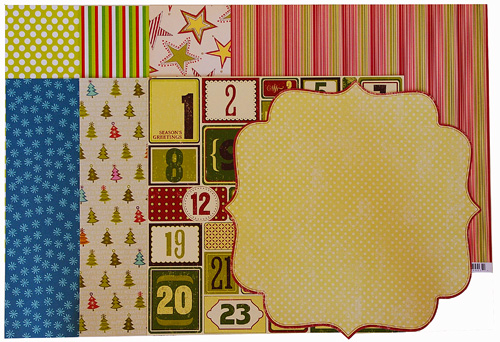
* 1 sheet KI Memories Trimmings Frosty Specialty Paper
* 1 sheet KI Memories Snowfall (2-sided)
* 1 sheet Making Memories Artisan Solid Die-cut Specialty Paper
* 1 sheet Making Memories Number (2-sided)
* 1 sheet Luxe Candy Cane Stripe (2-sided)
* 1 sheet Luxe Simply Lime Simple Dot (2-sided)
* 1 sheet Scenic Route Justin Road (2-sided)
* 1 sheet Scenic Route Parkman Road (2-sided)

This monthly kit includes (2) additional sheets of Patterned Paper from each of the four paper lines featured in our Flavors of the Month kit. The Patterned Papers included in this kit will be different than the ones featured in our main monthly kit. Get our Paper/Bazzill Club Kit delivered to you each month automatically with your Cafe Club Kit! Click here to join the Patterned Paper Club

Look at the Bazzill Club $6.50

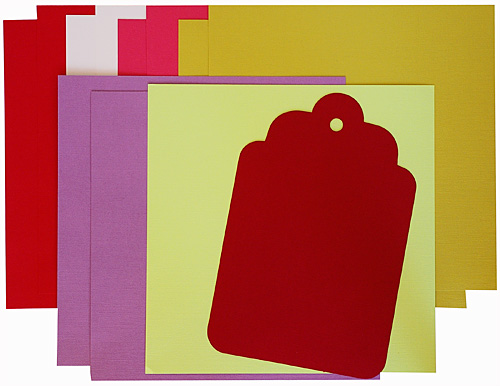
* 2 sheet Bazzill Santiago (KI
* 2 sheets Bazzill Lily Pad (MM)
* 2 sheets Bazzill Natural (KI/MM)
* 2 sheets Bazzill Red (Luxe)
* 1 sheet Bazzill Limeade (Luxe)
* 2 sheets Bazzill Ruby Red (SR)
* 1 sheet Crimson Tag Cardstock With An Edge (SR)
Get our Paper/Bazzill Club Kit delivered to you each month automatically with your Cafe Club Kit! Click here to join the Bazzill Club

And the Exclusive TSR Stamp Club $6.00

The ScrapRoom is proud to announce that we are now offering an exclusive Acrylic Stamp Set each month. Our stamps are manufactured by Wildflower Stamps and will be completely exclusive to The ScrapRoom. Each set will measure approximately 2"x 4" and will be priced at $6.00 each month. Get our Stamp Club Kit delivered to you each month automatically with your Cafe Club Kit! Click here to join the Exclusive TSR Stamp Club

Take a look at a few of the December Design Team Layouts:
Brenda Carpenter


Celeste Moores


Jenny Price


Shannon Brouwer


Gina Barone


Check out more Designs using the December Kits here in theIdea Gallery

Make sure you pop over to the message board in a few days for the Official December Challenges Forum and scrap your way to winning a prize!

Saturday, November 29, 2008

November Monthly Sketch

For the November Monthly Sketch Challenge we had a Double Whammy!
Both Single and Double Sketches were given (challengers choice!).
Here they are with a sample of members creations.
Don't forget to check the message board to see lots more!
November Monthly Sketch Challenge Thread

PhotobucketPhotobucket

JanineRachau created this great two pager using the sketch!


Photobucket

Deanna13 created this lovely layout using the sketch!


Happy Scrapping!
~Susan

Tuesday, November 25, 2008

December Double Shot, "Just The Edge" Strips Variety Pack, & Sneak Peeks!

DECEMBER DOUBLESHOT KIT: $15.00
Photobucket

CRATE PAPER PRUDENCE:
1 sheet Consideration (2-sided)
1 sheet Fortitude (2-sided)
1 sheet Hope Die-Cut Paper
2 sheets Bazzill Bluegrass
1 sheet French Vanilla
1 package Prudence Glitter Borders (includes 4 borders)
1/3 pack Prudence Glitter Die-cuts (approximately 15-16 pieces) (varies)

PINK PAISLEE POP FASHION:
1 sheet Bell Bottoms
1 sheet Parachute Pants
1 sheet Leg Warmers
2 sheets Bazzill Berry Sensation
1 sheet Bazzill Metallic Platinum (COOL!)
1 sheet Pink Paislee Green Fashion Script Alphabet Stickers
5 Bazzill "Just the Edge" Hillary Border Strips (varies)
3 Bazzill Hillary Paper Flowers
3 Bazzill Petunia 10mm Brads

Please e-mail us at admin@scrap-room.com to add this Doubleshot Kit to your next shipment!


Bazzill "JUST THE EDGE" 12" CARDSTOCK BORDER STRIPS: $15.00

Photobucket

Each color set contains (10) 12" Border Strips, one of each of the styles shown above
11 colors + 10 styles = 110 Border Strips! These make amazing quick-and-easy accents for scrapbook pages, cards, projects! You'll love having this variety at your fingertips!

10 Red Devil Strips
10 Rio de Janeiro Strips
10 Mexincan Poppy Strips
10 Guacamole Strips
10 Brisbane Strips
10 Atlantic Strips
10 North Sea Strips
10 Geneva Strips
10 Blackbird Strips
10 French Vanilla Strips
10 Chablis Strips

Please e-mail us at admin@scrap-room.com to add this Bonus Kit to your next shipment!


December Kit Sneak Peeks from the Amazing Design Team

Brenda Carpenter
Photobucket

Celeste Mores
Photobucket

Gina Barone
Photobucket

Jenny Price
Photobucket

Shannon Brouwer
Photobucket

Thursday, November 20, 2008

A little Sneak Peek at a project made with the December Kit!

I read about this little Holiday Planner from Eddie-N-Harley on the message board. She linked us up to Michelle Wooderson's blog, which had the directions for creating this cute little handy holiday treat for yourself or a friend. You might want to whip some of these up this weekend with some of your stash from Christmases past and give them to all of your friends and family members that you'll be seeing over the Thanksgiving holiday next week. What a great gift to help someone jump-start her Christmas shopping season on Black Friday. :)

Yes, I know that Michelle's planner is way cuter than my planner pictured here - but she did have the adorable house stamp (and she knows how to use it). And, perhaps even cooler is that Spellbinders die that she used to create those scalloped mats for the front of her planner and for her individual list-pages. Alas, I don't have that Spellbinder die - or a Spellbinder machine even. And, while this project did motivate me to install my Silhouette craft cutter to see if it might have one of these cute scalloped shapes installed, I was unable to locate a scalloped shape in the software. Now, that doesn't mean that the scalloped shape doesn't exist in the software; it just means that I wasn't techno-savvy enough to find it...div>

So, here is my version of the Holiday Planner, created with the KI Memories Festive layout kit in the December Flavors of the Month kit. The inside of the Planner features a pocket that holds the "wish lists" that my boys are filling out, along with two additional cards, labeled "Family" and "Friends" to keep track of presents for grandparents, neighbors, teachers, friends, etc. After Thanksgiving, my Planner will be OFF-LIMITS to everyone but me. I'll use it for shopping, carrying coupons, and making notes about all-things holiday related. There is a small pad of paper in the Planner, which I'll use to make list after list in an effort to stay organized - and best of all, everything will be all in one place. Thanks for the great idea, Michelle!

Enjoy!
Tammy


Monday, November 17, 2008

Teacher Gift


I have made these PENCIL BOUQUETS for my kids teachers the past two years. They are very easy to make. You can use any container. This year I used some of the little tin buckets from Target's Dollar Spot. Just fill your container with floral foam add pencils and leaves and a little moss if you choose. I also made a coordinating card with Craft paper remnants and pieces from a left over TSR kit.

WAAAHHHLAAA

a gift that is decorative and practical -- the teachers can actually let the kids use the pencils.

For hints on December's Kit just go to www.scrap-room.com click on Message Board - scroll down and click on "Flavors of the Month Kits". I will be listing hints to all four upcoming kits on the message board. ;)

Happy Thanksgiving!
Shawnna Samples
Mod Squad

Thursday, November 13, 2008

Hi everyone :)

I was looking through my scrapbook albums earlier this month and noticed something was missing. I have been scrapbooking for almost 10 years now and I can count on one hand how many pages I have done about just me. I knew I was underrepresented but I never realized just how much. I think most of us started this hobby to record our history and day-to-day life for our children and their children to reflect back on in days to come. I have to remind myself that I am a part of that history not just my kids. So I have a challenge for you all. I want you to create a layout about just you. Anything goes really as long as you are the star of it. You have until my turn to host the blog next month to do your layouts (December 14th) I will post mine then and those who have done one can post a link on that thread. I can't wait to see what you come up with. I think mine will probably be a page about all my current favorite things.

Have a great one
Shannon

Monday, November 10, 2008

Ruffled Ribbon

If there is one thing you can be certain to find on my layouts, it is ribbon! I just love the stuff! I never get sick of using it and I can assure you that I can never have enough of it! ;) To me, it is the perfect touch to any project, adding texture, dimension and color.
I am always trying to come up with different ways of using it. On one of my latest pages, I hand-sewed the ribbon to give it added dimension, with a bit of a romantic edge. Here is how I did it...

First, I weaved thread through the center of the ribbon using large, spaced stitches. Make sure to knot the end of the thread.


When I reached the end, I pulled the ribbon towards the knotted end of the thread to give it the gathered, ruffeled look.
Next, I knotted the other end of the thread to finish it off.


Voila! It is complete!


This technique is so simple and so easy to do! Be sure to give it a try! :)

Gina :)

Saturday, November 8, 2008

What do you do when...


your kids and family are SICK of getting their photo taken? This is where I am. My oldest loves taking her own picture but won't let me take a photo of her.
"Mom, that is the wrong angle, look at my hair....blah blah blah. "
My DH has resorted to NEVER smilling or making obseen jestures
when I try to get his photo. My youngest just runs and hides " NO MOMMY NOT AGAIN!"

I have taken photos of my flowers, can you see the little bee on that one? This picture makes me happy. Now with fall on its way I need to get some photos of leaves and pumpkins, and get ready for the snow...

Friday, November 7, 2008

I have a confession!

I am a box sniffer... YEP that is right I can't wait until my TSR box gets to me every month so I can smell the box. So all you closet box sniffers come out in the open with me! Our packages will be in the mail to us soon... So just picture me when you get that great little box at your door and take a sniff.... just the smell of the coffee, the paper and all the goodies... Oh it just brings a smile to my face every time...

Thursday, November 6, 2008

STUCK IN A RUT

Feel like your stuck in a rut. I have been for ... well most of the year. So here are some ideas to get you out of your scrapbook rut.

1. Take tons of pictures from odd angles. It will give you a challenge when you go to do your layouts.

2. White space... Try leaving some white space, (this one is hard for me because I feel like every spot needs to be filled!)

3. Get out some old product. You know some of thoes embelishments that are left over, if you have any, from the TSR kits.

4. Make some cards instead.

and last but not least.....

5. Check out our great gallery and scraplift.... There are so many many great pages, your sure to find something in there.

Wednesday, November 5, 2008

Changes

Sometimes after I finish a layout, take a photo of it, and see it on my computer screen - it just seems like something is missing. Many times I will go back and add some more finishing touches to my layouts. Here are two examples from my designs this month (see the original layouts here.)
On the first one I added another patterned paper strip to the top of the layout and added some green leaves by the flowers. On the second one, I added some "grass and flowers" and colorful buttons to the the group of trees. Sometimes a few extra details can really make a big impact on your layouts!


Thanks for checking out my layouts - hope you have a wonderful day! - Brenda :)

Monday, November 3, 2008

TSR FALL 2008 Class Description

by Celeste Mores

Good things come in small packages. Well, “good” may be an understatement here ;-)

For the Fall 2008 Class scheduled to begin November 10, we will complete four gorgeous projects utilizing each of the four November FOTM kits, with each project easily customizable to suit your needs. You will learn invaluable techniques for creating beautiful and practical mini books and organizers, and come away with tons of inspiration for gift giving.

Details, details:
Project #1: Love Notes Organizer
Learn the basics for constructing a mini organizer with envelope pockets. Ours will hold little note cards with loving messages. Of course, you can use the organizer for just about anything -- from greeting cards to recipes, journals to pictures. Your imagination is your only limit.


Project #2: The Perfect Wallet Size Book
Create this lovely itty bitty book to hold your wallet sized pictures. You will learn a unique and easy way to “bind” pages together and create a protective cover with button closure.


Project #3: From Book to Accordion
For this session, we will create a mini book with a ribbon tieback. Undo the ribbon and you have a beautiful accordion album as a table top or mantel display.


Project #4: Mini Book with Pockets
Waste not. We will create a book that will use every inch of your 12x12 papers, while dipping into your extra stash of ribbons and scraps. Pocket pages can hold pictures, journals, bookmarks, recipe cards and yes, of course, love notes.


As a crafter, gift giving to me is a lot about spreading some love, so our projects here are filled with ways to show our dears just how special they are. Of course, you can always repurpose your completed projects for something else, and we will explore those other uses during our class sessions as well. And have we mentioned the class costs only $10?

As with our previous classes, as the instructor, I will be available throughout the 4 week period to answer questions in the class forum and help you along with your projects. It will be a fun journey; I do hope you’ll join me.

(For more information, and to register for the class, please see the left side bar and scroll down to SCRAPROOM CAFE SERIES FALL.)