Sunday, December 30, 2012

Sneak Peek #6: Carta Bella Traditions (FOTM)

"50 Years Together" by Brenda Carpenter
"Family is at the heart of memory keeping. Document your favorite memories with the sophisticated styling of the “Traditions” collection. Rich colors and refined patterns combine in this beautiful, family-oriented compilation of papers and stickers. Traditional elements with a vintage twist make this collection perfect for your most treasured moments!"  -- Carta Bella blog

Saturday, December 29, 2012

Sneak Peek #5: Little Yellow Bicycle Winterings (DS)

"Snow Cold" by Aphra Bolyer
"Bundle up with Winterings! This collection combines a beautifully soft palette with patterns of cozy knits and textiles that will be sure to warm up all your crafting projects this winter season. Snowflakes and traditional wintry elements are sprinkled throughout to add that special touch of magical charm." -- Little Yellow Bicycle blog

Friday, December 28, 2012

Sneak Peek #4: Pink Paislee Portfolio (FOTM)

"Sisters" by Beth Hallgren
"We believe your memories are important.  We believe your stories are priceless.  We believe your photos and thoughts should be put on display like any well prepared portfolio.  This September we are bringing you a paper collection that works for your ‘everyday’ – for your every occasion and for your entire daily, weekly, monthly, and yearly memoirs.  You will reach for these papers and embellishments over and over again.  Fashionably basic.  Incredibly functional.  The way memory keeping should be.  Now go ahead…display your story."  -- Pink Paislee blog

Thursday, December 27, 2012

Sneak Peek #3: Fancy Pants The Good Life (FOTM)

"Let's Skate" by Melanie Call
"The Good Life is for ANY DAY OF THE YEAR!  You will love this line for anything in general to birthday, to fall to any season!  This collection is an eclectic mix of bold, graphic prints, and shabby, distressed textures." -- Fancy Pants blog

Wednesday, December 26, 2012

Sneak Peek #2: Simple Stories Sn@p! (FOTM)

"This Is the Good Life" by Jennifer Moore
"Sn@p! has a look and feel all it's own, from clean designs, bright colors and white white's, to random icons and on-trend images...Sn@p! offers a playful, yet completely functional, approach to your everyday memory keeping! It's Simple Stories... intensified!" -- Simple Stories blog

Tuesday, December 25, 2012

Sneak Peek #1: Fancy Pants Hopscotch (DS)

"Grandma's Garden" by Theresa Sovacool
"This line is chic and elegeant with loads of playful and vintage patterns!  Fun, flirty calicos and delicate, pretty florals—that what this line is all about!  We love the many uses of this line and you will, too!" -- Fancy Pants blog

Friday, December 21, 2012

Holiday Inspiration From ScrapRoom Members

If you aren't a member of the Message Board, you are really missing out.  Just sayin'.  There are lots of great ladies that are part of the ScrapRoom community:  they are funny, helpful, supportive, kind, awesome, loving people.  All the time.  And... they rock the layouts, cards, and tags like nobody's business.  So whether you are looking for inspiration or a conversation with a bunch of ladies who "get it"... stop by the board and say hello and look through the gallery.  And when you do, here's a little bit of what you'll see:

"Christmas Elf" by Deanna13
"Let it Snow" tag by TerryB
"Believe Joy" card by jojojorenee
"Tradition" by rgeile
"Joy" tag by scrappy_granny
Christmas cards by jasper
"I Sent Cards" by laura75

- Theresa/Savi

Wednesday, December 19, 2012

Sketchy Cards by Melanie

I made two extra Christmas cards inspired by this month's sketch from The ScrapRoom. Plus I even used scraps from the Crate Paper: Sleigh Ride kit...I love it when I finish a kit off :)

For the first card: I cut different sizes of squares out and "randomly" placed them on the card front. Attached Merry Christmas greeting with staples. Added twine to a button...then I was done!

For the second card: I cut rectangles out (all the same size) and placed them in line orderly. Stamped Thank You to my greeting tag. Attached it with twine and staples. Then put a little bling on the tree...all done!

Use this month's sketch to inspire some cards too...it's not just for layouts!
 

- Melanie

Monday, December 17, 2012

Photo Assignment: Favorite Decoration

It's the holiday season... and so many of us have treasures big and small that we display for our loved ones to enjoy.  Regardless of the actual cost of these decorations, we know they are actually priceless.  Sometimes, the "cheaper" they are, the more dear they become... and it's because of the story behind them.

Go ahead.  Try to talk to someone about your favorite decorations or traditions this time of year... and not explain why, or give more details, or share how it came to be.  Just try it.  Bet you can't!  It's because we're shameless storytellers, and that's just fine.  In fact, it's awesome.  So take a look around.  And take a picture of your favorite and record the story behind it like we did!

Aphra says:  "This is one I made with my Cricut and the Ribbons and Rosettes cartridge."
Theresa says:  "My dad carved and painted this nativity... I leave it up year round."
Melanie says:  "My favorite ornament is the one that my son (and I) made last year in Sunday School...okay he did have A LOT of help since a glue gun was involved!"
Jenny says:  "I don't really have a favorite ornament because they all have a special meaning to me, but as I walked past my Christmas tree today, this one kept standing out to me. Like most Americans, my heart is heavy and saddened due to recent events in Connecticut. This ornament stopped me in my tracks and reminded me to pray PEACE over the victims and their families."
Beth says:  "It was a very difficult choice but I'd have to say this is my favorite ornament because it reminds me of my childhood."
Brenda says:  "This is an old ornament that was from my husband's childhood. I just think it is so cute!"
These types of photos are a great addition to your Project Life, Month-in-Review, or calendar pages.  You may even be inspired to take more than one photo and make a layout about your family's treasures.  Feel free to share your photos, too - we all love ideas! 

- Theresa/"Savi"

Friday, December 14, 2012

Got Scraps? Then You Might Have a Gift, Too...

It's time to turn your scraps into layouts... and maybe a gift or two while you're at it!  In case there's a little bit of busy going on in your life right now, this particular Got Scraps Challenge is designed to be combined with other challenges (oh, like maybe the sketch challenge, with a little planning) or to be a kick-start to some gift giving.  And just like always, this challenge is designed to get you scrapping quickly and with a minimum of fuss.  You can do as much or as little as you like, in whatever style suits you.

Ready?  We're going to shake things up a bit and go a little out of order from the usual formula... which will actually make it easier to make a gift out of that special photo. 

Step 1:  Find that special photo... and maybe a frame while you're at it.
This 5x7 photo is from our last little mini trip to heaven.  I mean, the North Shore.  The 8x10 frame?  Pulled that out of the closet.
Step 2:  Find an almost-dead kit to match your photo.  No kit?  No worries - go dig through your scrap pile and find some coordinating patterned paper scraps.
Crate Paper Random was perfect for me... a touch of pink and orange to match our clothes with blue and grey to match the sky, water, and rocks.  The patterns didn't matter so much as I knew I would be using small pieces of it.
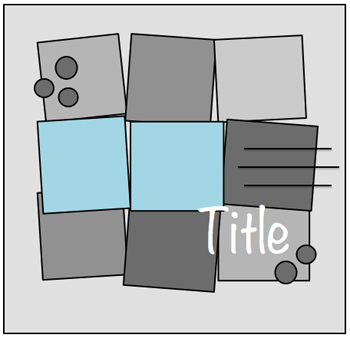
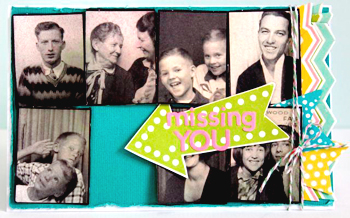
Step 3:  Cut some squares... any size, using any tool you prefer.
I used 1x1 squares.  I was going after colors more than patterns, so the smaller size worked for that.
Step 4:  Shop your stash for the extra bits, like alphas, journaling blocks, cardstock, and coordinating embellies. 
I got an awesome care package in the mail literally 15 minutes before I started this project.  The ribbon, brad, flowers, and phrase stickers are from that package.  I love you, my happy-mail friend!  THANKS!
Step 5:  Finish.  Make this layout your own.  Do your thing! 
And there it is!  My style is thick and lumpy, so I left the glass out of the frame.
I used glue dots and a squirt of Glossy Accents to hold the buttons and flower in place... just some extra insurance!
Check it out!  I made a gift for my husband for his desk at work.  I used some scraps.  AND... I used some stuff out of my stash AND the mailbox.  All with the power of squares. *love*

Now it's your turn!  I challenge you to turn squares into layouts... or gifts... this month.  You have until December 31st to link up your layout here for a chance to win a $10 gift certificate to the TSR Store.  Oh, and if you do happen to kill a kit - or four - stop by the Message Board and record it in our Kit Killer thread.  We're on our way to a goal of 225 dead kits by the end of the year - come help us out!

- Theresa/Savi

Wednesday, December 12, 2012

Altered Advent Calendar with Jenny!

Advent calendars are all the rage now days! You can find TONS of ideas for them all over Pinterest and other crafty websites. A few years ago, I found a couple of tree shaped advent calendars from Starbucks that I altered for my boys, and that's what we use for our countdown for Christmas. They LOVE finding little goodies in the boxes each day as we anxiously await for Christmas. :) When I saw the Simple Stories "Handmade Holiday" part of the December kit, I immediately knew that an altered Advent calendar was what I was going to create! The Simple Stories collection made it SOOOO easy...the sticker sheet already had all of the numbers printed on the little banner stickers, so pretty much all I had to do was cover each little box with some patterned paper, add the sticker, and cover with Mod Podge. See....how's that for easy peasy? 1) First, I started out with this blank Advent calendar from Hobby Lobby. It was marked $12.99, but it was 1/2 off the week I bought it. Woohoo!
2) Next, I took out one of the little boxes and used it as a "template" to cut all of my patterned paper. Just trace the box's front onto a random assortment of patterned paper, then cut out all of the shapes. These will be used for the "background" of each little box included in the calendar. 3) After all my patterned paper was cut, I laid them all out on my table in the order I thought looked best. You could be very symmetrical here and repeat everything in a certain order, but all I did was just fiddle with the papers and arranged them in different ways until they looked good to me. :) 4) Next, I applied Mod Podge to each little box and covered them all with the patterned paper. 5) I waited for the Mod Podge to completely dry, and then I took each number banner sticker from the Simple Stories sticker sheet and applied them on top of the patterned paper in number order. I outlined each sticker with a black pen to help make them stand out a bit. 6) Next, I added a layer of Mod Podge over the stickers and patterned paper and allowed all of the boxes to completely dry before putting them back into the calendar base. 7) Last, I made a bow out of burlap and glued it on top. The end result:
Sooo soooo easy, I tell ya! Our Advent calendars are my kids' favorite tradition during the holidays! Inside, I place candy, small toys, strips of paper with Christmas activities written on them (such as "holiday movie night!" or "make hot chocolate and go look at Christmas lights!"), or some other little treasure. It's so fun to think up neat little things to put in each box, and I LOVE watching my kids' faces as they open up a little surprise each day! :) I hope you have fun making holiday memories with your family this season. Merry Christmas, everyone!

- Jenny

Monday, December 10, 2012

It's All In the Details in December!

Kits have started landing across the country... and soon across the world.  It's sort of like Santa making a pre-holiday delivery - getting all the good stuff out early, right?  *grin*  Whether you have your kit in hand, or will soon, here's another little gift you can enjoy early:  detail shots! 
Aphra layers the Sew Fun banners - no sewing required!
Beth uses a photo frame as a journaling spot - great idea!
Melanie uses a little bit of everything - so easy and beautiful because our kits are all matchy-matchy.
Theresa used white embossing powder to alter these wooden snowflakes...
... Aphra dressed her wooden snowflakes up with pearls...
... and Beth painted her wooden trees!
Melanie attached this envelope with twine and a brad - and a little button - and check out the staple!
Theresa used the Sew Fun banners, flair, and little fussy cut arrow for a fun embellie cluster.
Beth gives Santa a perfect background - and just the right words to say!
Enjoy the details this month... whether they are in the kits you receive, on the pages you make, or in your homes & hearts.  Good things are everywhere, and life is in the details!

- Theresa/Savi

Friday, December 7, 2012

A Stitching Solution by Beth!

I'm an easy sell for every new tool that hits the market and the Sew Easy by We R Memory Keepers was no exception.  Readily forgetting that sewing a straight line is not one of my strong points! I practiced and practiced but was still prone to veering off course and ruining perfectly good paper.

After a lot of trial and error (make that lots of error) I came up with this idea.

First take a 2"x12" scrap of light colored paper and line it up vertically on your Sew Easy foam mat. Holding this paper down securely, make a row of stitching the length of the scrap.


Use the lines on the mat to guide your stitches.


Now take your scrap and hold or secure it with repositionable adhesive to your layout, positioning it exactly where you want the stitching to go. You can even experiment with placement by marking through the holes with a pencil and erasing if you aren't satisfied.


Once happy with placement then pierce holes through your template or mark with pencil and then pierce.


Now you can stitch!


With careful planning, the corners can be uniform
(I was not careful) :)


That is why my layout has brads accenting the corners!

Now I'm off to experiment with some of the other Sew Easy stitching heads.

Happy Scrapping!

- Beth

Wednesday, December 5, 2012

It's Card Season!

Christmas cards, winter cards, Hanukkah cards, cards as gifts, or cards just because... face it, it's the season for cards! Are you feeling slightly panicked? A little frazzled? Overwhelmed? Well, stop it. We're here to help! Every month the Design Team makes cards from every kit just for you - and this month is no exception. Find a design or three or five that you like and "cardlift" it. You'll be done with your cards in no time - and the people you give them to will truly appreciate a little handmade love in the mail or under the tree!

Jennifer Moore
Brenda Carpenter
Theresa Sovacool
Melanie Call
Aphra Bolyer
Brenda Carpenter
Theresa Sovacool
Melanie Call
Theresa Sovacool
- Theresa/Savi