Tuesday, April 30, 2013

Sneak Peek #5: Simple Stories Urban Traveler (DS)

by TSR Guest Designer, Gina Barone
"This is a must-have travel line that incorporates bold vivid colors, classic travel icons with vintage-retro artwork with our own Simple Stories touch, of course." -- Simple Stories blog

Monday, April 29, 2013

Sneak Peek #4: Simple Stories Vintage Bliss (FOTM)

Project Life Layout by TSR Designer, Aphra Bolyer
"We're happy to introduce VINTAGE BLISS - a bright, happy, blissful collection with a vintage touch.  We're so excited to share this fresh, fun and oh-so-happy collection with you...ENJOY!" -- Simple Stories blog

Sunday, April 28, 2013

Sneak Peek #3: Fancy Pants Park Bench (FOTM)

by TSR Designer, Jenny Moore
"This line is filled with sunshine and happy patterns and loads of style and flair…plus all new embellishments that will rock your pages!" -- Fancy Pants blog

Saturday, April 27, 2013

Sneak Peek #2: Little Yellow Bicycle Fern & Forest (FOTM)

(Sorry this sneak peek is late. We were having a little "technical difficulties" with the blog. We should be back on schedule now!)

by TSR Designer, Melanie Call
"These two whimsical collections combine natural elements with fun, fanciful designs, for capturing the adventures of your favorite boys and girls!" -- Little Yellow Bicycle blog

Thursday, April 25, 2013

Sneak Peek #1: BasicGrey Knee Highs & Bow Ties (DS)

"Me & Snow" by Theresa Sovacool
"Knee Highs and Bow Ties by BasicGrey will fill your crafty playground with stylish prints in bright schoolyard colors. Red-rover red, bubble-gum pink, leap-frog green and outer space orange will add a youthful charm to any of your designs." -- BasicGrey blog

Wednesday, April 24, 2013

Fame Not Fortune

We had a fun challenge over on the Message Board these last few weeks... TerryB whipped up a sketch and challenged our members to use it.  The prize?  Fame, not fortune.  In other words... in exchange for getting one more page done, the winner would get their layout featured on the blog.  Awesomeness!
Sketch by TerryB... and if you love this sketch, pay attention on reveal day.  Just sayin'.  *wink*
And our winner this month... a woman who totally rocks the layouts... is Gilly!
"Best Cousin Ever" by Gilly
I seriously adore this layout... and I think it's totally "Gilly".  Someday I would love to see Gilly in action as she builds her layouts.  I'm imagining mess and fun and ENERGY.  But until then, I'll have to satisfy my nosiness with a virtual chat over coffee:

Gilly, this is such an awesome layout.  What kit is this? 
I don't know what kit this was!!! LOL 
Seriously???  LOL!  (For the record, it's Dear Lizzy 5th & Frolic from 11/2012)  So, then... how did it all come together?
This kit was definitely chosen around the picture of my daughter and adorable great-niece...mainly due to colors...these two were so PINK, which is what I chose for the background.   Next with this layout, I wanted to try some new stencils I had just purchased. 
I stated earlier that this layout is so "you" - what makes this a Gilly layout to you?
I would say the elements I am liking to use right now are layering and sticking things randomly on the page. Probably paint is a bit me, and mixing fonts. Journalling in my own handwriting is me. 
I'm totally inspired by this.  Any tips/tricks you'd like to share? 
Mix stuff up, don't be afraid to mix lines and add depth and texture to your page.

Thanks, Gilly.  *big love*  Enjoy your moment of fame... although I would argue that love and adoration would be worth *something*, right?  HA!

Are you totally inspired by Gilly's page, too?   Thought you might be... so come back on May 4th.  We've got big plans, and this layout is part of it!  *hint hint*

- Theresa/Savi

Monday, April 22, 2013

National Scrapbooking Day at The ScrapRoom!


NATIONAL SCRAPBOOKING DAY CELEBRATION AT THE SCRAPROOM!
National Scrapbooking Day is Saturday, May 4th, and we'd like to take advantage of this special day to celebrate this memory-keeping hobby that we all share and love. Our challenge to you for the weekend, if you choose to accept it, is to complete at least one page. Hopefully, you'll be inspired to complete several pages, but we'd love it if every TSR scrapbooker completed at least one layout over the course of the weekend!
 
We'll be providing you with (4) different "Inspiration Piece Challenges", posted to both the Message Board and the TSR Blog at 8:00 am, 12:00 pm, 4:00 pm, and 8:00 pm on Saturday, May 4th. You'll have until 11:59 pm on Sunday, May 5th to upload your layouts and enter into any/all of the challenges. We will randomly select (2) winners from all of the message board and blog entries for this fabulous Amy Tangerine On-The-Go Scrapbooking Kit. Be sure to post your contact information when you place your entry. The winners will be announced on Monday, May 6th.
 
amy tan prize  
AND, all ScrapRoom Club members who participate in at least one of the National Scrapbooking Day challenges AND elect to receive a May shipment from us will be receiving a FREE Layout Kit in that shipment - as a THANKS for your business at The ScrapRoom and for celebrating National Scrapbooking Day with us!
 
So, mark your calendars for 8:00 am on Saturday, May 4th and join us as we celebrate scrapbooking and "get more pages done!" 


NATIONAL SCRAPBOOKING DAY SALE!

Our National Scrapbooking Day sale will begin on April 30th (when the website updates with the May kits) and will continue through Sunday, May 5th. We will be separating all of our available 2012 Flavors of the Month Kits and Doubleshot Kits into individual layout kits, so you can pick and choose the layout kits that you love the most. All 2011 individual layout kits will also be discounted. Visit our TSR STORE between April 30-May 5th to take advantage of this great sale!

AND, we're sweetening the deal by bringing back our FREE KIT OFFER.You must use the coupon code FREEKIT when placing your order in our shopping cart or via e-mail.

*Buy (4) layout kits, get (1) layout kit for FREE!

*Buy (7) layout kits, get (2) layout kits for FREE!

*Buy (10) layout kits, get (3) layouts kits FREE!

(Select free kits when placing your order, and we will apply the discount before processing. Free Kit discount will be applied to the lowest priced kits on your order.)


Friday, April 19, 2013

Project Life: Weeks 15 and 16

Hi everyone!  Just popping in today to share the next two weeks in my Project Life album.  This week I have lots of lovely spring colors, a few Silhouette cuts, and a ton of great product from the ScrapRoom's kits.

Week 15: Studio Calico Here & There


Since this week's layout was our Easter pictures and since the Studio Calico kit wasn't Easter themed, I pulled out my Silhouette Cameo to cut an egg and a bunny.  And then I just kept on going.  Ha ha!


I used another insert page protector for this spread.  Same as last time -- Becky Higgins' Design F cut dow to 6" x 12".

Right Side: With Insert


Right Side: Without Insert


I just had to figure out a way to include these three brads.  What I came up with is pretty simple:  two strips of washi tape (from previous TSR kits) topped with the brads.  


Week 16: My Mind's Eye Unforgettable


This layout is another example of photos from just one event, a day trip to New Orleans.  And with the right combination of page protectors (Becky Higgins Design A and Design F), I was able to include fourteen photos.  Gotta love some Project Life.  

Left Side


Title Card


Did you notice that this card is also based on the Project Life sketch that I created for April?  It's such an easy and versatile sketch.  

Right Side


Filler Cards


I really liked the floral journaling card, but I honestly didn't have much to write.  Instead, I used some Thickers to add New Orleans' nickname, The Big Easy.

Journal Card


For the Notes card, I cut down another 3x4 to give it a little more color.  The journaling itself is really just a list of some of the sights that we saw while on our trip.  I put number stickers on the different photos to correspond to the list.  What an easy trick!

Wednesday, April 17, 2013

Welcome Back, Terry!

Whether you are a regular on our Message Board or just follow the blog... I'm sure you know Terry.  She's been a TSR Favorite and a Mod Squad member, and now she's back as our Message Board Moderator.  We're all pretty excited about it!  Terry is a kind, thoughtful, creative gal - and incredibly inspirational.  I can personally blame Terry for getting hooked on Project Life, and someday I want my photos to be as awesome as hers.  *big love*  But just in case you haven't met Terry yet, pull up a cup of coffee and let's chat!

TerryB
Terry, how long have you been with TSR?  And what do you love about it?  
I joined TSR back in December of 2007. I love the kits, but I especially love the community.  It's a great group of gals on the message board, and I'm so glad to be a part of it.
So, I've got to ask...  Gina, our guest designer, can do a cartwheel.  Can you? 
Haha! Yes. I can do a cartwheel, but I prefer not to. It hurts my wrists!
You take amazing pictures.  What equipment do you use?  What's the most important tip or trick you've learned?
I'm a Nikon gal! My husband bought me a D5100 for my birthday last year, complete with a zoom lens. *love* My favorite lens though, is my 50mm prime lens. Love the shots I get with it.

The most important tip I've learned, generally speaking, is to carry your camera with you, and take lots of pictures. They're digital, and you can always delete later. Technically speaking...don't be afraid to zoom in, and use natural light whenever possible. I'm slowly learning to get out of automatic, but it's a long process, and I've got a ways to go.
List 5 random non-scrappy things found in your scrappy space.  And how about letting us have a peek at your space, too?
A ceramic bird, a cup of coffee, an Easter lily (it makes my whole room smell wonderful), a tiara *wink*, and my theater tickets. I'm not sure why they are there really, but I'm afraid if I move them now, I won't remember where they are!

I use a corner of my bedroom as my designated scrap space. I don't have a lot of room, so I am constantly reorganizing, and finding new ways to store my supplies.
What's your fave hot beverage?  Are you one of the (many) gals that loves the coffee that comes in our kits?
I love coffee and tea. I have a couple cups of coffee in the morning to jump start my day, and then I switch to decaf tea.

I've mentioned Terry's Project Life pages, so let's look at one of that format.  Plus, let's have a look at one of her traditional layouts, too!

Thanks, Terry!  Welcome back, and thanks for bringing so much inspiration and thoughfulness to our Message Board!

- Theresa/Savi

Monday, April 15, 2013

Hidden Embellishments!

Hey everyone! I've got a quick tip for finding some fun "hidden" embellishments from your Elle's Studio part of the kit this month. At the bottom of your patterned papers, you'll find these barcode strips that have the name of the manufacturer and paper information:
But don't throw them away after you trim them off!  If you flip them over, you'll find these little hidden gems:

Look at all those fun extra embellishments you can use!  I was able to use almost all of these on my 2-pager this month.  I cut out the Kraft colored scalloped border and used it below my photos. I used the "XOXO" red strip and used it on the left side of my 2-pager.  Then, I cut out some of the little banner looking titles and put them on my photos and one below my title for added detail:

The end result:
Don't forget to look on the backs of those barcode strips! You just may find some little hidden treasures for your pages there! ;)

- Jenny

Friday, April 12, 2013

Extra Embellishments?

What do you do with your extra embellishments from each month's kit???? Do you use every last one or maybe save a few for the "perfect" layout :) ????

I like to use most of mine because I know TSR will have more fabulous embellishments the next month. BUT there are a few I do hoard save for future projects.

I like to keep my saved embellishments in Making Memories plastic mason jars. I keep them in the cute little bags and just toss them in. I love how it is clear so I can see what I need. You can tell I am saving my wooden elements and enamel dots (LOVE them)...they are a perfect touch to add to many projects!


When I was creating an Anniversary card for my grandparents...I knew the cute wood veneer birds (Sept 2012 kit) would be perfect for the two love birds!


If you are a hoarder saver like me...don't forget to actually use those treasured embellishments!

- Melanie

Wednesday, April 10, 2013

Quilted Cards... & Envelopes, Too!

You know me... always looking for something to do with my scraps and trying to kill off a kit (or five)!  Well, this month I used up my April Doubleshot Kit scraps by making fun quilt-y cards.


I know a lot of scrappers out there are also quilters... or like me, used to be quilters and maybe some day will be again (come on, retirement!!!).  But now when I get the urge to get quiltin'... I grab my favorite quilt patterns and paper scraps instead.  Paper quilting is actually a lot easier than real-life quilting.  For one thing, the canvas is much much MUCH smaller.  And you don't have to worry about pesky seam allowances.  *fist pump*  Corners always match up - and if they don't... well, nothing a cleverly-placed embellishment can't fix!

Let's get to it.  You'll need some cardstock, scraps, matching embellies, some quilt patterns... and those LilyBee tone-on-tone papers we've been getting as cardstock lately.  For this example, I'm going to use Flying Geese as my quilt pattern (one I love, but actually pretty much suck at getting the corners right in real life) and the Carta Bella Traditions kit from January 2013.
"Flying Geese" (search for quilt patterns online... you'll find tons!)
Cut a full sheet of cardstock in half and fold each piece in half.  These will be 6x6" cards.  Yes, I know they will cost $1.12 to mail because it's a square and a little heavy... but square mail is cool.  And still way cheaper than buying a card and still having to mail it!  And quilt squares are, well, square.
I'm doing one strip of the Flying Geese pattern.  I cut the dark patterned paper into a 2.5" wide strip.  Then, to get my "geese" shapes, I cut a 2.5x2.5" square and cut it into quarters.  No seam allowances = super easy paper quilting!  Just cut squares and off you go!
To make an envelope for a 6x6" card (with a little room to spare), cut those LilyBee papers to 10x10", score in 3.75" from each point, trim the little overlap area, and fold.  Easy peasy - especially if you have a Martha Stewart Score Board.  The instructions for this size envelope are printed right on it. 
As typical for me, I distressed the edges, laid on a bunch of machine stitching, and made some elaborate tags.  Do as much or as little as you like - your cards can be done your way!
A closer look:  I like my quilt-y cards to have a sewing "feel" to them.  So I like to add ric-rac, embroidery thread, buttons, and little safety pins.  Plus I like to attempt to try to use up at least a small part of my stash!  LOL
These cards are a fun way to use up your scraps and your stash... and they let you scratch that little quilting itch, too!  If you make some quilt-y cards, I'd love to see them - share them in the comments below!

- Theresa/Savi

Monday, April 8, 2013

Project Life: Weeks 13 and 14

Happy Spring, Scrappy Peeps!  I hope that you are enjoying a little sunshine and a little warmer weather in your part of the world.  As you can see from my two Project Life spreads that I am sharing with you today, we have some sunny Spring Breaks here in Louisiana.   All of the lovely floral patterns and soft colors in this month's kits were a perfect fit for all the Spring colors in my photos, too.  I keep getting lucky that way.  Ready to see?  Don't forget that you can click on any image to see it larger.

Week Thirteen:  Crate Paper Maggie Holmes 


This spread doesn't actually include a week's worth of pictures.  Instead, it includes twenty photos from a day trip to a plantation that my kids and I took last Spring Break.  In order to accommodate so many photos, I cut down a Becky Higgins Design F Page Protector so that it ended up being 6" x 12".  

Left Side


For my title card, I used the wood plank paper.  I loved the soft neutral color with so many bright pictures, and the pattern seemed appropriate for all the pictures of the plantation home and grounds.  For the actual title, I used a mixture of Thickers from my stash.  This came about as an accident since I didn't have enough of any one style to create the whole title, but I really love how it turned out.  That happy accident will be happening again.

Title Card


Journal Card


Right Side (Without Insert)


For my Week 14 spread, I had a handful of random photos from our time at home the week of Spring Break.  I used cards from the Project Life Add On kit and the B sides of some Flavors of the Month papers.  

Week 14: Elle's Studio and Teresa Collins


Since I couldn't find any sort of unity for these pictures, I decided to treat the left and right sides separately.  For the left side, I pulled out the corals and I pulled out the reds and blues for the right side. Once I had a color scheme in mind, it was easy to sift through all my goodies to find the colors.

Left Side


Title Cards


Right Side


To create this heart, I attached two small strips of the striped sticker strip to a piece of scrap white paper and then punched out my heart.  And how cute is that wooden button from the Flavors of the Month kit?


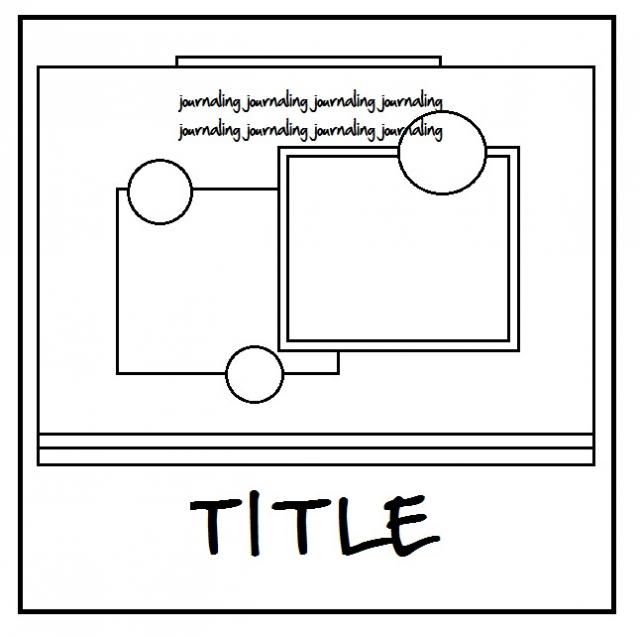
The last card is based on the April Project Life sketch.  Instead of using it for the title card, I used it for a journaling card with large sticker alphas.  You can see the sketch used for my title card on my Week 16 spread, which I'll be sharing next week.  In the meantime, here's the sketch if you'd like to give it a try.

April Project Life Sketch


Thanks for stopping by today.  See you soon with Weeks 15 and 16.