Two of a Kind by Sarah
Thursday, June 30, 2011
Wednesday, June 29, 2011
Tuesday, June 28, 2011
Monday, June 27, 2011
THIS WEEK'S SCRAPROOM STEAL: (June 27-July 3)
THIS WEEK'S SCRAPROOM STEAL:
FUNKY ALPHABET STAMP SET (TSR EXCLUSIVE!): $4.20 (40% Discount)
This week's Steal is an acrylic Funky Font Stamp Set - and a ScrapRoom Exclusive! You won't find this anywhere else. Featuring 32 stamps (letters and symbols), the set size measures approximately 3"x 4".
(Shipping for NON-Club Members will be $1.00./TSR Members can elect to have this item shipped with your next club shipment.)
You can purchase this week's Steal through our shopping cart by clicking on the following link: THIS WEEK'S SCRAPROOM STEAL. Or, if you are currently a TSR member, then you can e-mail us with your order at admin@scrap-room.com. :)
HERE'S HOW IT WORKS:
ScrapRoom Steals Shipping Policy:
Sunday, June 26, 2011
Saturday, June 25, 2011
Friday, June 24, 2011
Welcome Our June Guest Blogger Terry!
Hi. My name is Terry Boyer, and I live in North Tonawanda, NY with my husband and three boys.We like to keep busy, and I like to record all the wonderful memories. Ever since I was a kid, I've loved taking pictures. A love I inherited from my Dad. So when I was invited to a scrapbooking party 10 years ago, I just had to check it out. I started scrapbooking then, and never looked back.
That's me and my oldest son Brad. Dang...I can't believe he turned 17 this year!
What I love about the ScrapRoom:
The kits of course! I love that we get a sampling of four different lines each month. The pretty patterned papers, coordinating cardstock and the embellies shipped right to my door. It's like celebrating my birthday every month. Seriously! I also love the challenge that comes with using papers and embellies I might not normally pick out myself. Sometimes, the kits I think are going to be the hardest to use, end up being my favorites. I love that! I also like Tammy's very generous skip policy, but who would want to skip anyway!
The message board! You won't find a nicer group of ladies on the web. They are encouraging, talented, funny, and well....just plain nice.
The blog! The blog is chock full of ideas, fun challenges, and contests. But my favorite thing on the blog is sneak peek week. Oh, and once, they let me host it!
5 Random Facts about ME:
1. My absolute, hands down favorite color is PINKI! With three boys, it gets hard to use it on my scrapbook pages, but I try to sneak it in every now and again.
2. I loooove collecting rocks! It drives my boys crazy though, because they end up carrying them for me. I mainly use them outdoors in my garden or on my patio, but you'll find them here and there indoors as well.
3. I have NO sense of direction. I tease that I could get lost in my own backyard. Garmin is my best friend!
4. My family and I have been IN, four of the five Great Lakes. Only Lake Superior left to conquer, but it's only a matter of time.
5. I don't like to cook. Now don't get me wrong, I love to BAKE...cookies, cakes, muffins (I've yet to make a pie). But cooking dinner? Not so much!
Thursday, June 23, 2011
An Extra Sketch and a Reminder!!
Hi, Sarah here with an extra sketch to get your imagination going! Clouds, butterflies and flowers seem to be in right now so I used those elements as inspiration for this sketch.
For my layout I used the super cute Pebbles from the June Flavors of the Month kit. I just love that flowered paper! It immediately reminded me of this picture of my little girl that I have been saving for almost a year now. It matches her outfit perfectly :)
Everything on my layout above is from the June Flavors of the Month Kit and Double Shot Kit except the white letters (May embellishment kit) and the flowers with the jewels in the center and twine (from my stash).
And don't forget about our Sketch Challenge we having going on at the moment. You can check out the deets HERE.
I hope you have enjoyed this sketch! I can't wait to see what you do with it!
Tuesday, June 21, 2011
A Cool Tip from Aphra!
Hi there ScrapRoom friends! Aphra here today with a quick tip to help you "Get more pages done." When I have multiple photos to include on a layout, I print out a collage. Here's two of my ScrapRoom layouts using collages.
A Day of Egg Hunting
For this layout, I used the Glitz papers included in the May ScrapRoom Flavors of the Month kit and a 5" x 7" collage print. I love that I was able to fit six pictures on the layout without it feeling too cramped. I like a little white space.
Perfect Day
And here I incorporated seven pictures in the form of an 8" x 10" collage print in a layout using SEI's Corinne from the June Flavors of the Month kit. And still the layout has plenty of white space and room for embellishments.
Both of these collages were done at WalGreen's One Hour Photo. I chose a white background, but there are other lots of other color choices and layout options. You can pick whichever photo you like best as your focus. And best of all, it's inexpensive. The 8"x10" was $3.99 and the 5"x7" was $1.99. You can check it out HERE.
There are several other places that offer collage prints. You can order them from WalMart and have them shipped to your home with prices starting as low as $0.09. I have also used Snapfish and Winkflash, which both ship to your home. It just depends on who happens to have the best deal at the time and how quickly I want the print.
Monday, June 20, 2011
THIS WEEK'S SCRAPROOM STEAL: (June 20-27)
THIS WEEK'S SCRAPROOM STEAL:
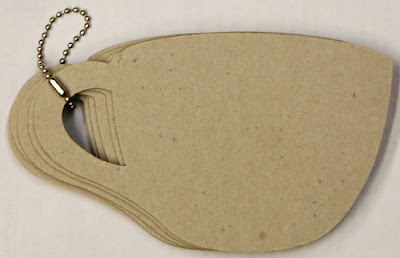
MAYA ROAD COFFEE MUG CHIPBOARD MINI-ALBUM: $2.50
This week's Steal is a Maya Road Coffee Mug chipboard Mini-Album featuring (5) chipboard pages. It measures approximately 4"x 5".
(Shipping for NON-Club Members will be $1.99./TSR Members can elect to have this item shipped with your next club shipment.)
You can purchase this week's Steal through our shopping cart by clicking on the following link: THIS WEEK'S SCRAPROOM STEAL. Or, if you are currently a TSR member, then you can e-mail us with your order at admin@scrap-room.com. :)
HERE'S HOW IT WORKS:
ScrapRoom Steals Shipping Policy:
Friday, June 17, 2011
Father's Day is Upon Us
Good morning and did you notice that it is Friday? Well, it's Father's Day weekend, and I don't know about you, but I have plans to take TONS of pics of my hubby, my father-in-law, and my daddy. This month I asked some of the DT girls to create a few projects in lieu of Father's Day, and of course they rocked it! Take a look...
Well, I sure hope you have a great Father's Day, and please share any of your Father's Day projects here...we would love to see them!!
Daddy's Boy by Jenny
Happy Father's Day Dad! Card by Melanie
Always a Boy at Heart by Kim
See? Totally rocked it, right?Well, I sure hope you have a great Father's Day, and please share any of your Father's Day projects here...we would love to see them!!
Thursday, June 16, 2011
DT Inspiration with Sarah!
Hello, hello! I hope everyone is having a great start to their summer!
Today I am here to talk to you about stitching and doodling. They are my go to techniques to finish off a layout. You know the layouts that you look at and think "this just needs something"? When that happens to me I always add some faux stitching and doodling.
On my spring layout below that I created with the June Double Shot kit I used both a black and white pens for my doodling and stitching. I have found it best to keep lots of different brands of brown, black and white pens handy. All pens look different on different colors and types of paper. Before doodling I will test the pens on the back of the paper I am going to write on (or on a scrap if I have one) to see which pen works the best.
Let's talk about stitching first! I love it! I love how it looks on a layout, but can't always use my sewing machine or have time to hand stitch. When that happens I use faux stitching. All the stitching on this layout is fake (except for the criss crosses in the corners), but I bet you couldn't tell that! Most people mistake my faux stitching for real stitching. The trick is very simple. Use a paper piercer! I first pierce holes along the edges where I want to add my faux stitching and then go back with a pen and connect them. It is so fast and easy and tricks just about everyone!
You can see below where I have pierced the holes for my faux stitching and a close up of my doodling. On this layout I did all my faux stitching and doodling free hand, but if I want straight lines I will use a ruler. For the stitching use a ruler and pencil to draw the straight lines then erase the lines and connect the holes. I doodle on pretty much every layout. It's never fancy, usually just a few lines around the edges of my paper. On this layout I doodled around the edges of my photo collage to bring all the photos together.
Tuesday, June 14, 2011
Lan's Happy Space!
Hello there! Want a glimpse of where I hideout and create? My husband and I recently converted the corner of our basement, which previously was used as a storage/utility area into my new scrap room/office and I just love this room! The other side of the room has two desk computers where the kids can hang out and play their Nick Jr games.
Right above my desk are pretty floating tissue paper flowers in a fun colorful combo of pink/red/and yellow.
I used my Cricut and vinyl to cut out the quote. :)
My papers are stored alphabetically by manufacturer in my recycled priority boxes that I receive the TSR kits in.
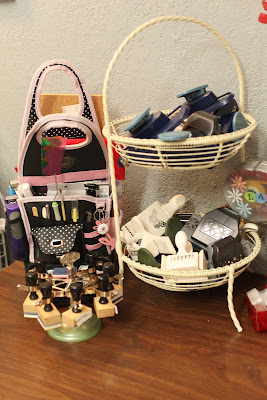
On my desk are my most used and go to tools. My Fruit stand has been turned into a Border Punch Caddy.
Ribbons are stored by color in Hobby Lobby jars. And Baskets hold other punches, stamps, Cricut cartridges, etc.
Right above my desk are pretty floating tissue paper flowers in a fun colorful combo of pink/red/and yellow.
I used my Cricut and vinyl to cut out the quote. :)
My papers are stored alphabetically by manufacturer in my recycled priority boxes that I receive the TSR kits in.
On my desk are my most used and go to tools. My Fruit stand has been turned into a Border Punch Caddy.
Ribbons are stored by color in Hobby Lobby jars. And Baskets hold other punches, stamps, Cricut cartridges, etc.
Monday, June 13, 2011
THIS WEEK'S SCRAPROOM STEAL: (June 13-19)
THIS WEEK'S SCRAPROOM STEAL:
DAISY BUCKET "WISHING YOU A BEAUTIFUL DAY" STAMP SET: $3.00
This week's Steal is an acrylic stamp from Daisy Bucket Designs, measuring 4"x 2" and featuring the embellished greeting, "wishing you a Beautiful Day." I LOVE this greeting for a card - it works for occasions and non-occasions alike, and the little dots and flowers that surround the greeting are just begging to have some "BLING" added to them to really make the message pop!
(Shipping for NON-Club Members will be $1.99./TSR Members can elect to have this item shipped with your next club shipment.)
You can purchase this week's Steal through our shopping cart by clicking on the following link: THIS WEEK'S SCRAPROOM STEAL. Or, if you are currently a TSR member, then you can e-mail us with your order at admin@scrap-room.com. :)
HERE'S HOW IT WORKS:
ScrapRoom Steals Shipping Policy:
Friday, June 10, 2011
We {Heart} Banners!!
It's Friday...It's Friday...Whoot! Whoot!! I'm here today to share with you what is trending in our gallery...BANNERS!! From month to month here in The ScrapRoom Gallery we are using banners to embellish our layouts and cards. They are perfect for a title or just to fill in that bare space in the corner! Take a look at how our talented design team used banners this month...
Picture Perfect by Jenny
My Boys by Melanie
A Happy Family by Kim
Happy & Carefree by Aphra
A Warm Hello Card by Sarah
Happy With You by Melanie
Don't you just love their takes on using banners? Well, I sure hope they have inspired you to use a few soon! Have a great weekend!Thursday, June 9, 2011
Design Team Inspiration with Aphra!!
Hello my scrappy friends! Glad you've stopped by today because I have a quick and easy tutorial for you. We'll be making the bow on this card from the June gallery.
Are you ready? Ok. Here we go.
Step One: Cut a 1" x 5" strip of double-sided patterned paper. Notch both ends of the strip and cut in half.
Step Two: Add notched strips to your project.
Step Three: Cut a 1" x 8" strip of paper and create a loop.
Step Four: Place a glue dot on the insdie and press together to create a figure eight.
Step Five: Use a scrap of 1" x 2" paper from one of previous strips and add it to the center of figure eight with reverse pattern showing. Wrap around the back and adhere.
Step Six: Attach to your project and embellish.
Hope you've enjoyed this easy tutorial. If you create a bow for your projects, please share it with us on our Facebook page. We'll stop by to ooohhh!!! and ahhhh!!! over it and leave you some love. Have a great day!
Subscribe to:
Posts (Atom)