Welcome to our last installment of the Patterned Paper Series for November. Today's notes talk about using large shapes with your patterned paper. I made a hand drawn leaf that I scanned. You may use if you can copy and resize it. Otherwise, you may email me a request and I'll send you a word document copy that reflects the leaf in the exact size.
I, also, used an old scalloped circle paper from my stash along with the PhotoPlay Paper Autumn Day line from The ScrapRoom's November 2015 kits.
Brenda Carpenter's notes read, as follows:
1. Cut Large Shapes out of your Patterned Paper. An easy way to transform your paper is to cut it into shapes that enhance your layout. Some of my favorite shapes are circles, flowers, hearts, and stars. You can free-hand your designs or trace chipboard or other objects (plates and bowls work great for large circles.) I used this technique to create the large heart shown in the layout below, (actually the image on Brenda's paper above.) Note that I used a tone-on-tone print, which will read as a solid on your layout and help balance the compelling patterns.
Another way to achieve this look is to use die-cut shaped papers and cardstocks that are available/ The blue polka dot circle works with the large brown floral for two reasons. The green border breaks up the two patterns and the blue dot is a small print that reads as a solid color in the layout. The large and small patterns work together without overwhelming the layout and photos.
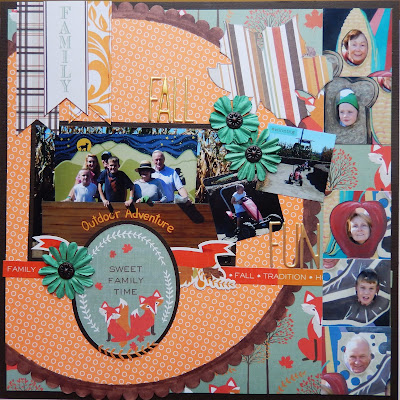
"Fall Fun" [12 x12 inch layout] - (Brenda's instructions adapted to my layout.)
- Photo sizes - 4x5, (7) 2x2 inches
- Start with brown cardstock as a base.
- Trim Foxes to 11,5x11.5 inches.You will be covering up most of this paper, so make sure that you cut out the inside to use on other designs.
- Trim approximately 2.5 inches off of scalloped circle cardstock or patterned paper. I used a large scalloped circle from my stash and colored the outside rim with a brown marker to tie it in better to the PhotoPlay Autumn Day line.
- Cut out maple leaf from Multistripe - approximately 4x3.25 inches.
- Matte largest photo with brown paper.
- Cut banners and "Sweet Family Time" oval from patterned papers. Matte oval with brown paper.
- Assemble layout as shown using sticker sheet, cut shapes and flowers with brads from stash to match.
**Tip: Brenda used the large circle to create another layout that should be our next installment. I, however, used the "Foxes" paper cut out for other purposes. You will see her 8x8 inch layout in a future blog post.
Also, I did take Brenda Carpenter's handcut heart idea and applied it to a different layout that I created with the November 2015 kits:
Have a wonderful day!!!Also, I did take Brenda Carpenter's handcut heart idea and applied it to a different layout that I created with the November 2015 kits:


No comments:
Post a Comment