April Kits are now available!
Click here to order the Cafe Club "Flavors of the Month" Kit
MY MIND’S EYE PENNY LANE “FREE BIRD”:
* 1 sheet Free Bird “Beauty” Fond Circles Die-cut (2-sided)
* 1 sheet Free Bird “Beauty” Charmed Stripes (2-sided)
* 1 sheet Free Bird “My Friend” Bonded (2-sided)
* 2 sheets Prism Soft White Felt Cardstock
* 1 MME Free Bird “My Friend” Transparency Die-cut
Fire Engine Red Button Mix
COSMO CRICKET GIRL FRIDAY:
* 1 sheet Girl Friday Saturday (2-sided)
* 1 sheet Girl Friday Sunday (2-sided)
* 1 sheet Girl Friday Elements (2-sided)
* 2 sheets American Crafts Blush Cardstock
* 1 pkg. American Crafts Green Rockabye Foam Alphabet Thickers
DAISY BUCKET IN THE MEADOW:
* 1 sheet In The Meadow Finley (2-sided)
* 1 sheet In The Meadow McKenna (2-sided)
* 1 sheet In The Meadow Addison (2-sided)
* 2 sheets Bazzill White Canvas Cardstock
* 1 pkg. Daisy Bucket Explore Rub-ons
MAKING MEMORIES LOVE NOTES:
* 1 sheet Love Notes Artisan Die-Cut Edge
* 1 sheet Kraft Heart Brocade
* 1 sheet Kraft Cherry Blossom
* 2 sheets American Crafts Crimson Cardstock
* 8 Making Memories Love Notes Tickets (varies)
* 1 Making Memories Love Notes Ribbon Slide (varies)
* approx. ½ yard MM Love Notes Grosgrain Stripe Ribbon
Check out the Embellishment Club $10.00
* 1 pkg. Cosmo Cricket Girl Friday Ready Set Chipboard
* 1 pkg. Daisy Bucket “Sunrise” Rub-on
* 1 Jenni Bowlin “LOVE” Bingo Card
* 1 sheet Jillibeans Really Red Alphabeans Alphabet Stickers
Get our Embellishment Club Kit delivered to you each month automatically with your Cafe Club Kit! Click here to join the Embellishment Club
Here is the Patterned Paper Club $6.50
* 1 sheet Cosmo Cricket Girl Friday Wednesday (2-sided)
* 1 sheet Cosmo Cricket Girl Friday Thursday (2-sided)
* 1 sheet Daisy Bucket Celeste (2-sided)
* 1 sheet Daisy Bucket Chloe (2-sided)
* 1 sheet Making Memories Kraft Pillow Ticking
* 1 sheet Making Memories Battenburg (2-sided)
* 1 sheet My Mind’s Eye Free Bird “Love” Free Bird (2-sided)
* 1 sheet My Mind’s Eye Free Bird “Love” Desire (2-sided)
This monthly kit includes (2) additional sheets of Patterned Paper from each of the four paper lines featured in our Flavors of the Month kit. The Patterned Papers included in this kit will be different than the ones featured in our main monthly kit. Get our Paper/Bazzill Club Kit delivered to you each month automatically with your Cafe Club Kit! Click here to join the Patterned Paper Club!
Look at the Bazzill Club $6.50
* 1 sheet Bazzill Parakeet Peek-A-Boo EMBOSSED LEAVES (MME)
* 2 sheets American Crafts Rouge (MME)
* 2 sheets Prism Intense Teal (CC)
* 1 sheet American Crafts Apricot (CC)
* 1 sheet American Crafts Leaf (DB)
* 1 sheet Prism Frosted Teal (DB)
* 1 sheet American Crafts Chestnut (DB)
* 2 sheets Bazzill October Birthstone Bling (MM)
* 1 sheet Bazzill Tortilla (MM)
Get our Paper/Bazzill Club Kit delivered to you each month automatically with your Cafe Club Kit! Click here to join the Bazzill Club!
And the Exclusive TSR Stamp Club $6.00
"WISHING YOU" STAMP KIT (Set of 13 / Set Size is 3” x 4”)
The ScrapRoom is proud to announce that we are now offering an exclusive Acrylic Stamp Set each month. Our stamps are manufactured by Wildflower Stamps and will be completely exclusive to The ScrapRoom. Each set will measure approximately 2"x 4" and will be priced at $6.00 each month. Get our Stamp Club Kit delivered to you each month automatically with your Cafe Club Kit! Click here to join the Exclusive TSR Stamp Club!
Take a look at a few of the April Design Team Layouts:
Brenda Carpenter
Celeste Moores
Jenny Price
Shannon Brouwer
Gina Barone
Check out more Designs using the April Kits here in the Idea Gallery
Make sure you pop over to the message board in a few days for the Official April Challenges Forum and scrap your way to winning a prize!
Pages
▼
Tuesday, March 31, 2009
Monday, March 30, 2009
Back to what I know works for me...
After reading about Becky Higgins' Project 365 Album Project in December, I just knew that was what I wanted to do in 2009. I've been wanting to force myself into the habit of taking more photos, and I just knew that this would be the project for me. Okay, I was wrong... I got a late start (which didn't help), and while I was getting into the habit of taking at least one photo each day, I got stalled out on the journaling and the printing of the photos. I couldn't remember what photo I had taken each day to know what I should write about on the journaling cards, and since I don't upload my photos from my camera to my computer and print these photos out on a daily basis (since that's a huge chore!), I found myself getting even more and more behind. I do love the idea - but it didn't work out for me this year.
So, I'm back to what I know works for me - my 8"x 8" SNAPSHOTS album. I journal a little bit every day and create one 8"x 8" layout each week. With this system, I stay caught up on my journaling each week, and I print my photos out in bulk about once a quarter (much better timing for me). After printing my photos, I slide them into the page protector opposite the weekly journaling - and I'm ready to scrapbook the photos whenever I find the perfect layout kit to correspond with the pictures. I feel caught up because the journaling is done and the photos are printed out and ready to scrapbook as soon as time and inspiration strike!
Maybe next year I'll figure out how to make the Project 365 system work for me, but for 2009, I'm back to being an 8"x 8" Snapshots girl. :) So, in honor of the 8"x 8" layouts that I have grown to love, I'm issuing a challenge this week. Use the layout below and create your own version based on the sketch in whatever size makes you happy. :) I used the My Mind's Eye Penny Lane kit in the April Flavors of the Month Kit, and I must tell you that this kit was really fun to work with. I embellished the modern transparency tree with a few buttons for dimension, and I used those adorable Jillibeans Alphabeans stickers from the April Embellishment Kit for the title.
So, create your own layout based on the above layout and post the link to your page in the comments section. We'll be choosing a random winner next Friday, April 3rd, and the winner will receive this fun little prize package from Making Memories, which will ship out with your April ScrapRoom shipment!
MAKING MEMORIES JUST CHILLIN’ JOURNALING BOOK KIT
*2 Journaling Books (each with 20 pages)
*1 Pen
*175 Alphabet Stickers
*46 Word Fetti Stickers
*58 Rub-ons
I can't wait to see your layouts!
Tammy
Wednesday, March 25, 2009
April Bonus Kits and Sneak Peek!
April Bonus Kits are available to order! E-mail us at admin@scrap-room.com to add any of these Bonus Kit to your next shipment!
April Double Shot Kit: $15.00
1. MY MIND’S EYE BLOOM & GROW:
1 sheet Bijou Birds Brown (2-sided)
1 sheet Candy Sripes (2-sided)
1 sheet Bohemian Vines (2-sided)
2 sheets Prism Papaya Puree Medium Cardstock
1 sheet Bazzill Ruby Red Cardstock
1 sheet MME “Bloom” Die-cut Accessory Sheet
Making Memories Greenhouse Blossoms & Buttons
*7 printed paper blossoms (varies)
*2-3 tulle blossoms
*greenhouse button mix
2. PINK PAISLEE FASCINATING:
1 sheet Enthralling
1 sheet Spectacular
1 sheet Alluring
2 sheets Bazzill Red Cardstock
1 sheet American Crafts Black Cardstock
1 Pink Paislee Fascinating Flower (black OR cream)
¼ pkg. Pink Paislee Fascinating Chipboard Elements (varies)
Approx. 1 yard May Arts Black/Cream Striped Grosgrain Ribbon
If you are already a member of our Doubleshot Club, then you will be automatically slotted to receive this kit unless you e-mail us that you would like to skip your kit or cancel your membership by 11:59 p.m. CST on April 3rd. If you are not a member of the Doubleshot Club but are interested in receiving this as a one-time purchase, please e-mail us at admin@scrap-room.com to request the April Doubleshot Kit. Quantities are limited, and extra kits for non-club members will be sold on a first-come, first-served basis.
Bonus Kits:
LITTLE YELLOW BICYCLE BABY SAFARI GIRL MINI-ALBUM KIT: $19.00
1 Baby Safari Girl 6x6 Decorative Edged Tablet (contains 24 sheets)
*(12) 6x6 decorative edged patterned papers (designed to fit on chipboard album pages)
*(12) 6x6 patterned papers
1 pkg. Baby Safari Girl Chipboard Embellishments
1 pkg. Baby Safari Girl Flannimals (Flannel Animal Stickers)
½ pkg. Baby Safari Girl Fabric Word Stickers (varies)
1 Little Yellow Bicycle Decorative Edge Chipboard Album (contains 6 chipboard pages)
E-mail us at admin@scrap-room.com to add this bonus kit to your April shipment.
LITTLE YELLOW BICYCLE BABY SAFARI BOY MINI-ALBUM KIT: $19.00
1 Baby Safari Boy 6x6 Decorative Edged Tablet (contains 24 sheets)
*(12) 6x6 decorative edged patterned papers (designed to fit on chipboard album pages)
*(12) 6x6 patterned papers
1 pkg. Baby Safari Boy Chipboard Embellishments
1 pkg. Baby Safari Boy Flannimals (Flannel Animal Stickers)
½ pkg. Baby Safari Boy Fabric Word Stickers (varies)
1 Little Yellow Bicycle Decorative Edge Chipboard Album (contains 6 chipboard pages)
E-mail us at admin@scrap-room.com to add this bonus kit to your April shipment.
And..................April Kit Sneak Peeks!
Gina Barone
Shannon Brouwer
Brenda Carpenter
Celeste Mores
Jenny Price
Tuesday, March 24, 2009
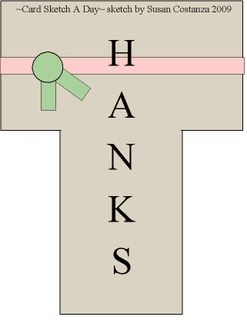
Give me a "T"!
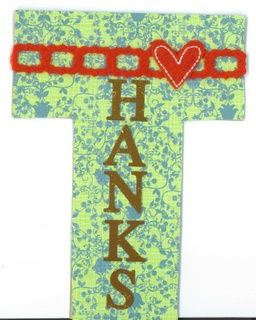
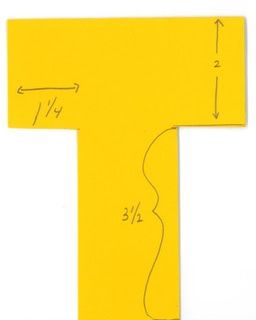
Let's have a little fun with cardmaking this month. Try cutting the card into the first letter of your sentiment.
Here is T for Thanks:
Template:
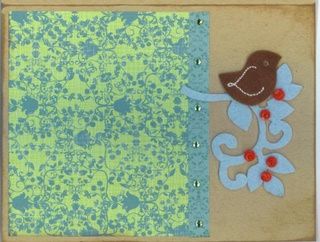
I made these notecards using more of the March kit:
Here is T for Thanks:
Template:
I made these notecards using more of the March kit:
Monday, March 23, 2009
Put a little *sparkle* in it!
I love to use alpha stickers to create the title blocks on my layouts. But what do you do when you start running out of a certain color or a particular font? Well, here's an idea. Pull out your letter stickers, along with those neglected glitter bottles that we all own (at least I think we all do), your Xyron sticker maker and some wax paper or a waxy paper plate that will catch the mess but allow you to pull the sticker back off. As a final option, you can use a dimensional adhesive (like Glossy Accents or Diamond Glaze) to set the glitter and create a three dimensional effect.
I have a ton of the American Crafts Mumbo Jumbo letter stickers from a few years back. They came in all these fun colors, but most of the time I like to keep my title blocks fairly unified. When choosing your letter stickers, make sure that you pick a size that will fit in the Xyron sticker maker and it definitely helps if the sticker isn't too delicate, otherwise it will likely rip at some point in the process.
Run the letter sticker through the Xyron upside down and *carefully* remove the sticker from the release film.
Place the sticker on the wax paper or waxy paper plate and pour the glitter on. You may have to rub the glitter into the sticker a bit with your finger to make sure it adheres well.
Let the letter sticker sit for a bit before transferring it to your layout, because anytime you're working with glitter, it is messy! You may choose to set the glitter at this point by applying a thin layer of dimensional adhesive to the top and letting it dry completely. I actually prefer not to use the dimensional adhesive because it takes away some of the sparkle, and replaces it with a high gloss sheen, but that's a personal preference.
One common sense tip I've learned along the way is that the darker the letter sticker you're using, the darker your glitter choice should be. I generally use the lighter colored stickers to cover with glitter, just because coverage is not an issue then. So is any one brand of glitter better than the other? Maybe. I have glitter by both Making Memories and Doodlebug, with the latter being a finer grain glitter. Both work well, but the Making Memories glitter does seem to cover better/thicker. But I love the color choices that Doodlebug offers better. I'm also anxious to try this process with the Doodlebug Crushed Velvet flock!
Have fun!
Jenny
Thursday, March 19, 2009
Are you thinking VACATION yet???
It was colder than spring in my neck of the woods today but we've had some super sunny teaser weather these past few days that I can't help but spring ahead. Way ahead. As in, V.A.C.A.T.I.O.N.
Now, I'm usually trigger happy when it comes to picture taking. But in the last four weeks -- that's how long I've come out of SAHMhood and into a full time job -- I have not taken a single shot. Zilch, zero, nada. My precious digital SLR, not a cheap camera, I may add, has sat lonely in its case for almost a month. Can you believe that? Not a good thing for a scrapper. So to get myself out of this rut, and in line with my vacation dreaming mode, I've been looking up tips on getting the best pictures once I'm there on vacation land far far away. Here's my list so far:
Sign, sign, everywhere, sign.
Take pictures of street names and road signs. The hotel room plate number, to remind your of where you stayed. If you're driving, take pictures of interesting trucks and bumper stickers. Out on the beach, write in the sand the name of the beach. Look for interesting landmarks, which sometimes are right under your feet.
La Cuisine
Food captures cultural flare. Take snapshots of the meals BEFORE you eat them. Take a picture of the restaurants you visit, the outside structure plus zoom in on the restaurant name itself. And to capture the ambiance within, lose the flash. Don't forget the kids licking their ice cream, you and hubby sipping from the same drink.
Show me the money!
I like to take pictures of the menu (ask if they'll let you keep one) and Today's Special signs. I like to keep receipts too, to look back years later of how much things used to cost.
Get some sun.
Take before and after shots of your tan lines. Get up early one day and wait for the sun to come up, camera ready. Or if you're a night owl like me, wait for the sunset. They say you really should watch the sun set at least once a year.
Get Up Close and Personal.
Don't forget to zoom in on those sea shells on the sea shore. Walk around the beach and take pictures of others' sandcastle creations (ask permission first).
Don't forget you.
Many times, I don't like to pose within the scenery shot because I want to remember the place itself, but it is nice to prove that I really was there. So here and there, I will plant myself in the shot. Often though, it's all about my kids so as long they're in the pictures, that's often proof enough for me.
But don't be self-centered.
It doesn't have to be all about you. You don't have to have your face (or your family's) in every shot. Take a picture of that artist painting the lighthouse. The locals selling at the flea market. Of course, I highly recommend asking permission first.
Lastly, here's a one-stop website I really enjoyed reading through: Best Family Photography Tips. Enjoy!
Sunday, March 15, 2009
Oldies but Goodies (with a giveaway)
Random Integer Generator
Here are your random numbers:3
Timestamp: 2009-03-23 18:43:51 UTC
WINNER WINNER CHICKEN DINNER
Congrats Janine!!!!
Janine said...
This is one of my favorites:http://thescraproomclub.invisionzone.com/uploads/1216165690/gallery_3990_728_438037.jpg
March 17, 2009 2:58 PM
Who is ready to have a little fun?????
We are about to journey into the past and dig out some older layouts.
Yep, you heard me right.
To be entered to win a FREE exclusive TSR April Stamp Kit (to be shipped in your April shipment) all you have to do is post a comment with a link to your favorite layout (one you created) from 2008 or any year before. All entries are due by March 22nd 10 pm CST. The winner will be selected by random integer on March 23 and will be updated on this blog post.
Looking forward to seeing all your entries, and just for kicks I have added a few of my favorite layouts from early 2007.
Monday, March 9, 2009
Hand-Sewing on Layouts
Ok...I have another obsession. It's alright...I can admit it! :) You see...this new obsession is hand-sewing on my pages. I think the tiniest of stitches makes for the perfect detail. :)
At first, I was a bit intimidated but once I gave it a shot, I quickly realized how easy it really is. It takes just a few pre-punched holes by using a paper piercer, needle and floss.
I begin my stitches from the back side of the paper...
And place a small piece of tape to keep the end of the floss in place.
There are so many different stitches you can use but here are a couple of my favorites. Mind you, I by no means can even sew a button so this is huge for me! (Ok...No laughing! I can hear you!) :)
But you want to know what is even more fun than sewing? Collecting of all these pretty colored flosses! :)
Friday, March 6, 2009
Altered Priority Box Tutorial
So today I want to show you how to alter a priority box (you know the thing your kit comes in every month). It is super easy to do and makes for a wonderful extra storage solution.
Okay first you will need a few supplies:
~used priority box
~heavy duty scissors
~acrylic paint/ paint brush (any color)
~ruler
~pencil
~coordinating papers and embellishments (your choice)
~adhesive (I used my ATG)
Now that we all have our supplies, lets get started. First you need to find a good working area that you will be able to leave your box for a little while after painting it so it can dry.
1. Measure from the bottom up to 12 1/4 inches and mark with the pencil. Then from the top front corner measure 4 inches going in and 4 inches going down and mark with a pencil. Trace a straight line going from one 4 inch point to the other 4 inch point. Repeat this for both sides. Now cut on your lines.
**You could also just as easily take a cropper hopper and lay it onto your box and trace around it.**
2. Now this part can get a little messy, but it is so fun. Take the acrylic paint you chose and paint all the markings that will show up around the edges you don't want seen. I used white for my box and did 2-3 coats on the corners and bottoms to make sure nothing would show through, of course the darker the color the fewer the coats you will need. Just make sure that you let your box dry between coats. After you are done painting let it sit and dry completely before continuing on to step 3.
3. Now that your box has completely dried take the papers you chose and measure them to fit slightly smaller than the sides of the box (this way you see the painted corners). Now adhere your papers to both sides with your adhesive. I left my back and bottom paperless. I did triple coat the back and bottom in paint so there are no markings showing through, but found it unnecessary for me to cover with paper since noone will see those sides, but you can feel free to cover them with your papers if you choose.
4. Once you are done adhering your papers you can now take on the task of adding your coordinating embellishments to your box. As you can see with mine I added some ribbon, letter stickers and a little bling.
Now you have a storage box that is both functional and pretty. If that isn't enough incentive think of it this way; a cropper hopper costs between $8-$10 and this is something you already have on hand at home so you can save a few dollars to spend on my supplies. These are great for storing your TSR kits.
They could also be used for more than scrapbooking supplies. Try using them to store your cooking magazines, or all those pages your kids color for you that you just can't seem to part with. The possibilities are endless. I would love to see your altered boxes, so once you finish one come back here and leave a comment on this post with a link to the picture of your box.
Enjoy,
Angela